
Maker Team member Joana of @critterwood.creations.patterns is back with another incredible tutorial for seasonal dolls. It's impossible for us to "pick" a favorite - so we didn't! You'll have enough felt to make multiples which is what we suggest. Besides, who ever heard of a pumpkin patch with just one pumpkin?
Fall is a time for harvest festivals and celebrations. It's when many fruits and vegetables are ripe for picking and farmers are busy keeping the crows away. To celebrate this magical time of year, I have put together these fun dolls using warm colors to reflect the season. Make as many pumpkins as you like in different colors and fill your patch. Let's get started!
Skill Level: Intermediate
Time: 2 - 3 hours per doll
Additional Supplies:
Pumpkin Patch Pattern (click to download)
Red Coloring Pencil
12" length of Twine or String
6" length of Ribbon
5" Doll Needle - optional
Directions:
Scarecrow
1. Print the Pumpkin Patch Pattern above and cut out pattern pieces. Trace Scarecrow pieces onto corresponding felt and cut.
2. Using an erasable pen, draw the eyes and mouth onto face. Glue on nose with a small amount of glue. Backstitch the mouth and satin stitch the eyes using gray thread. Lastly, add a cluster of white stitches on each eye.

3. Blanket stitch around the body with matching thread. Stop before completely closing to add stuffing and then finish stitching closed.

4. Cut fringes 1/8” apart on all four hair pieces, two long and two short. Glue the long pieces to the back of the head and the short ones to the front, layering the hair so it covers the whole head. Trim if necessary.

5. Make the arms by blanket stitching the pieces together and stuffing them. Leave flared end unsewn and, once arm is stitched, cut fringes every 1/8” in flared area to make hands.

6. To attach arms, start on one side of the body (right under neck) and insert needle all the way to the other side. Attach first arm. Pass needle back to the starting point and add second arm. With a back and forth motion, sew on both arms and tie off with a knot under one arm.

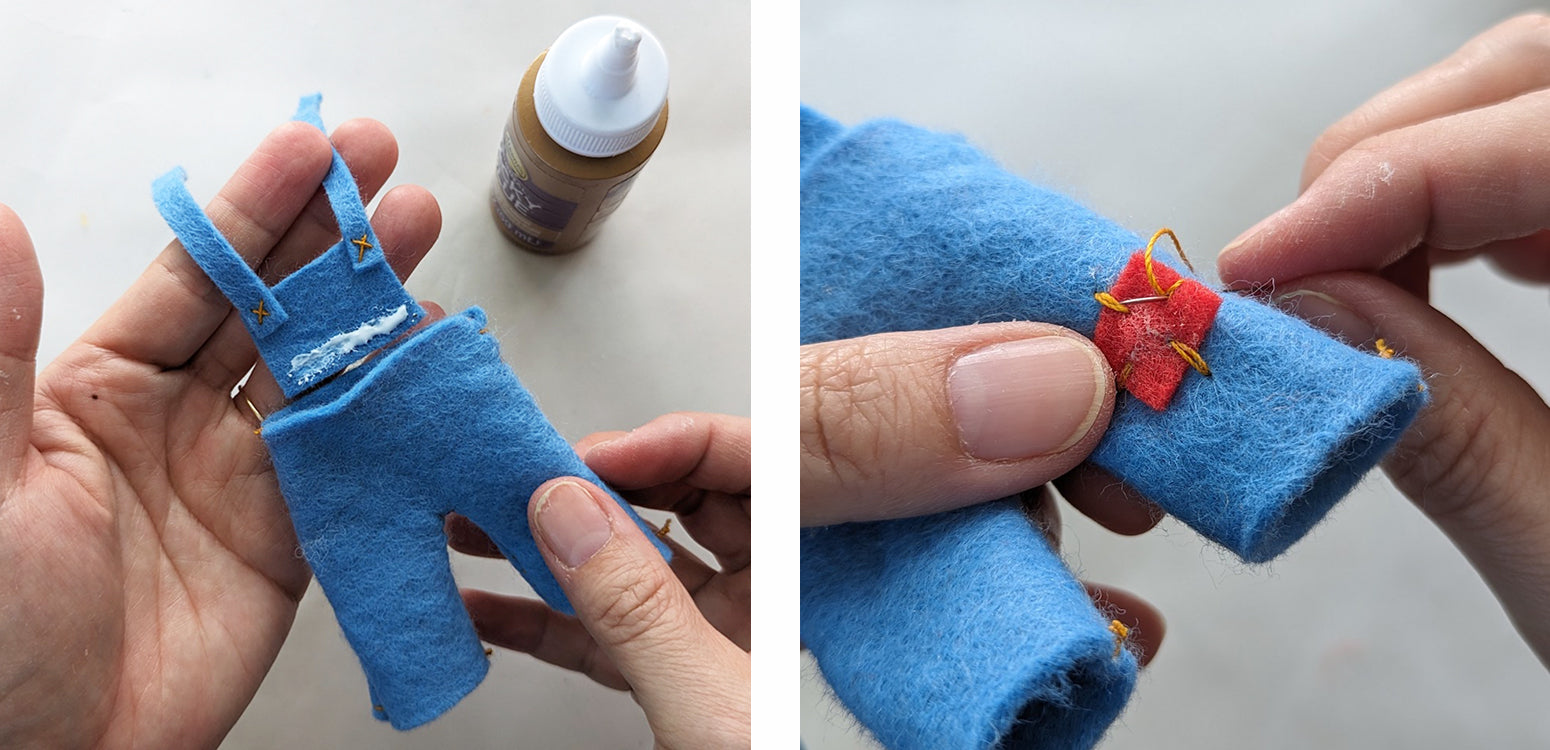
7. Back stitch the front and back of pants along the outer and inner sides. Turn inside out.

8. Attach straps to the bib with a small ‘x’ and glue the bib to inside of overall front. Sew a patch onto the knee.
9. Fold shirt in half at the ‘triangle’ and backstitch under the arms to form sleeves. Turn inside out.

10. Dress the scarecrow. Criss cross overall straps on back and sew them to the waist band with an ‘x’.

11. Glue fringe around the feet.

12. Stitch two square patches to the brim of hat.

13. Backstitch all the pieces of hat top and turn inside out.

14. Sew top of hat to brim with a straight stitch. Wrap twine or string where top and brim meet to hide stitches and tie.

15. To finish, add blush to cheeks using a red pencil. Tie twine or string around waist and add a ribbon scarf to neck.

Pumpkin
1. Trace Pumpkin pattern pieces onto corresponding felt and cut out.
2. Using an erasable pen, draw the eyes and mouth onto face. Make a small stitch for mouth and satin stitch the eyes. Add a cluster of white stitches on each eye.

3. Blanket stitch around the body with matching thread. Stop before completely closing to add stuffing and then finish stitching closed.

4. To attach arms, start on one side of the body (right under neck) and insert needle all the way to the other side. Attach first arm. Pass needle back to the starting point and add second arm. With a back and forth motion, sew on both arms and tie off with a knot under one arm.

5. Cut two sets of pumpkin head and body. (There should be eight pieces total.) Cut the first set into segments. Assemble the pieces by gluing them back onto their identical counterpart.

6. Blanket stitch pumpkin head pieces. Blank stitch pumpkin body pieces following the dashed lines marked on the pattern.

7. Make the stem by blanket stitching the sides together. Sew onto pumpkin head.

8. Glue collar on the front and back. Sew the sides with one stitch.

9. Cut a 1" slit on backside of pumpkin body and dress the pumpkin.

Crow
1. Trace Crow pattern pieces onto corresponding felt and cut out. Taping the pieces to the felt makes cutting easier.
2. Begin by backstitching the back to the side pieces. See the color coordinated dots on the pattern for guidance. Repeat with the belly. Leave an opening for stuffing.

3. After sewing the belly, turn body inside out. Stuff with Polyfil and finish sewing closed.

4. Sew two overlapping wings onto each side. Cut small slits on tips of the wings and tail.

You now have your own mini pumpkin patch! Good luck picking a favorite!

Thanks to Joana for designing and writing this tutorial! You can follow her on Instagram @critterwood.creations.patterns or visit her website. Stay tuned for more tutorials from the Benzie Design Maker Team!


