
"Take a trip down Candy Cane Lane with me." What could be sweeter than a candy-colored candy cane house nestled on the tree? Do you see the striped trim?! Maker Team member Melody of @mel_part has a long history of making ornaments and we're so happy she's contributed this Candy Cane Cottage tutorial to our Christmas in July celebration. You should probably make a whole batch because it's going to be a crowd favorite!
I originally got into felt crafts when I made an interactive stuffed Christmas tree for my toddler. Each year I add new ornaments to her collection. She loves all things pink right now, so I created this sweet little Candy Cane Cottage pattern for our first ornament of the 2025 season. The colors in the Supply List create the cottage as pictured, but I recommend playing with a color combo that is exciting for you!
Skill Level: Beginner
Time: 2-3 hours
Supplies:
One 9 x 12" sheet of Blush Wool Blend Felt
One 9 x 12" sheet of Oats Wool Blend Felt
One 9 x 12" sheet of Linen Wool Blend Felt
One 9 x 12" sheet of Red Wool Blend Felt
DMC Embroidery Floss in 224, 321, 3345 and 3866
Embroidery Needles
Tacky Glue
Scissors
Water Soluble Marker
Polyfil
Additional Supplies:
Candy Cane Cottage Ornament Template (click to download)
Freezer Paper - optional
Directions:
1. Print Candy Cane Cottage Ornament Template and trace pattern pieces onto cooresponding felt colors. Cut out. Since some of the pieces are small, you may find it easier to use the freezer paper method to transfer the pattern.

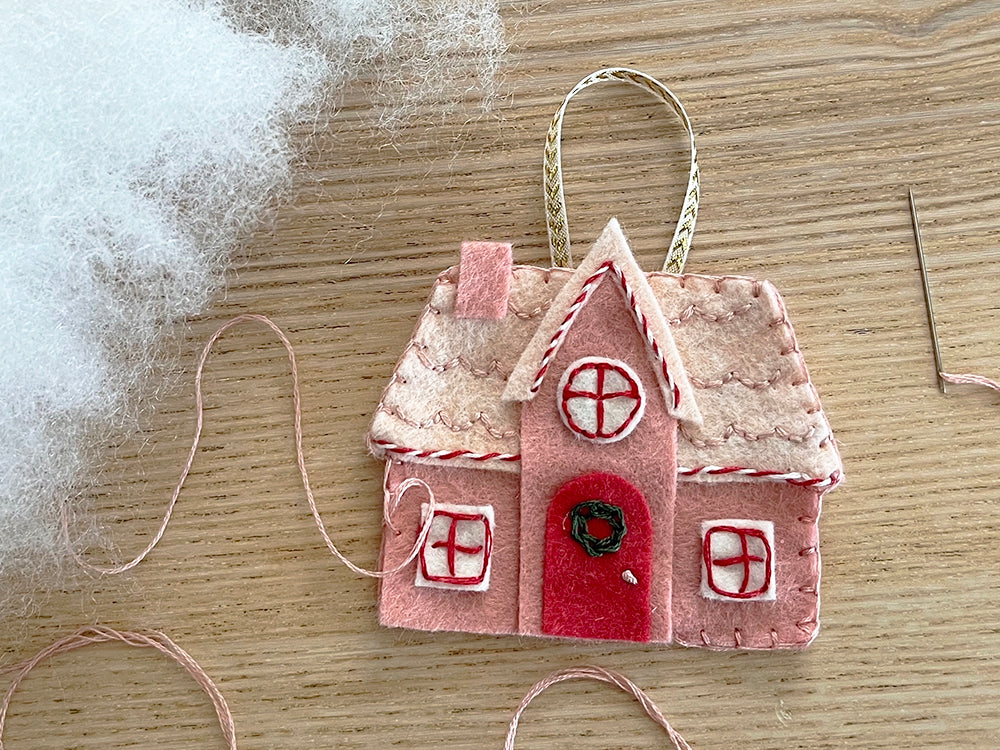
2. Use water soluble marker to draw a scalloped embellishment on Roof. It should fit three rows of scallops, as shown below. Use DMC 224 to backstitch along guidelines. (Use three strands of floss for all stitching.)

3. Stitch embellishments listed below on Windows and Door. If you need guidelines, use the water soluble marker for this step, too.
Windows - Backstitch window panes with DMC 321.
Door - Make a wreath from lazy daisy stitches with DMC 3345. Add door knob with a french knot with DMC 224.

4. Backstitch Roofline to narrow Base piece with DMC 3866. Sewing clips or pins can help hold pieces in place while stitching.

5. Backstitch Roof to larger Base along bottom edge of Roof. Refer to Backing piece to ensure proper placement height.

6. Weave DMC 321 through the backstitching done in Steps 4 and 5 to create a candy cane effect. To start, bring needle up through the first white stitch then weave red floss under second stitch. Continue weaving through all white stitches. Push needle back through the final stitch so end of red thread is at back of the piece. Knot and cut.

7. Glue ribbon loop to top of Backing piece. Then glue front elements of cottage together, using the picture below as reference.

8. Place embellished cottage front on Backing piece, with ribbon ends sandwiched between. Use DMC 224 to blanket stitch pieces together. Blanket stitch under glued elements so stitches are not visible. Pause stitching 2" from finish to add Polyfil or felt scraps. Don't overstuff! Finished stitching closed.
Hang your Candy Cane Cottage on your tree and enjoy!


Thanks to Melody for designing and writing this tutorial! You can see more of her work on Instagram @mel_part and TikTok @mel.part. Stay tuned for more Christmas in July projects debuting this week!


