
Maker Team member Katie of @katie_kinsman_artist is back with a new tutorial highlighting her eye for detail! Katie has created an incredible Love Bird tutorial that is full of opportunities for personalization. It seems fitting to give that someONE special, someTHING special for Valentine's Day. We hope you love it!
I’ve always loved Valentine’s Day. When I was a child, I made all of the valentines that I exchanged with my classmates. My brother and I gained a certain amount of primary school celebrity with our handmade cards! Perhaps this is part of the reason why I still enjoy creating special valentine-themed pieces as an adult. I hope you have fun creating your very own little Love Bird for Valentine’s Day!
Skill Level: Advanced
Time: 5 hours
Additional Supplies:
Love Bird Pattern (click to download)
Transfer Pattern (click to download)
Directions:
Love Bird
Create your Love Bird to match the example below or mix and match the colors of felt and floss to suit your creative vision.
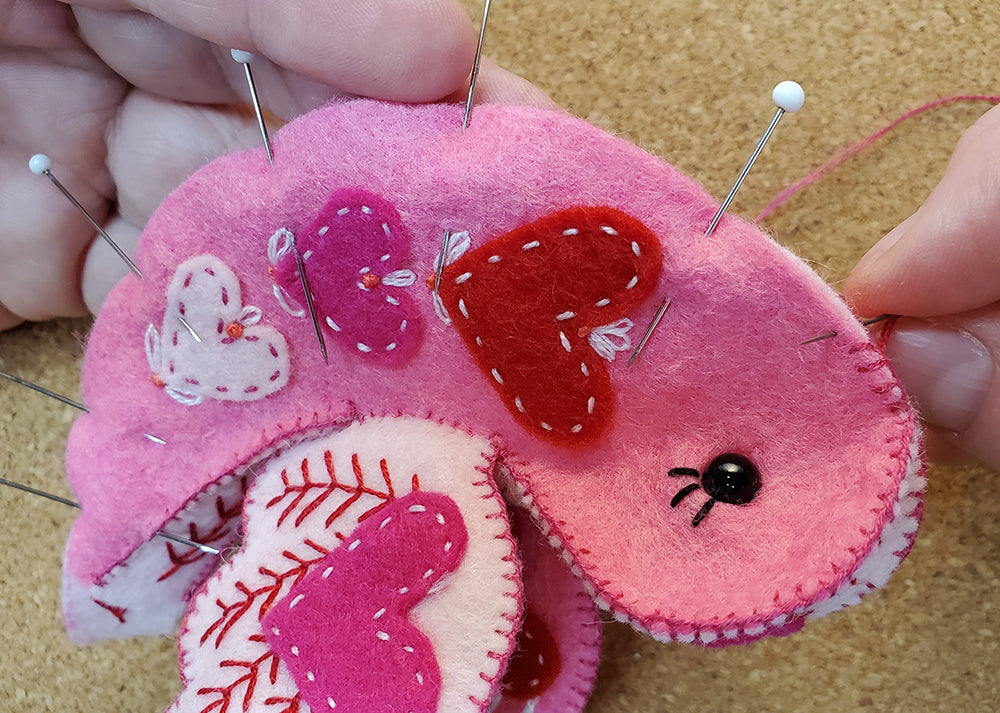
1. Once you have chosen felt colors, cut out all of the pattern pieces, including the Hearts. The Transfer Pattern is specifically designed to be used with iron-on adhesive or Sticky Fabri-Solvy. Using either of these will make cutting out all of the pieces a snap!

2. Choose the embroidery stitches for your Love Bird and add them to Tail, Body, Wing, Top Back, and Bottom Tummy pieces. If using one of the suggested pattern transfer methods, add the stitches right on top of the dashed lines on the pattern pieces, then remove the transfer paper according to manufacturer's directions. If this includes getting the felt wet, let it dry thoroughly before moving on to the next step.

3. Glue the Hearts where indicated on the pattern. You only need a “v” of glue for each. Once dry, use a straight stitch to secure the Hearts to the Tail, Body, Wing, Top Back, and Bottom Tummy.

4. On the Body pattern piece, note where the safety eyes and eyelashes are to be added. Using an awl or a sharp pair of scissors, make a small hole for the safety eye shaft. Thread two strands of black embroidery floss and stitch three eyelashes around the eye hole. After knotting and tying off, place the safety eye back into the hole and secure in place with the locking nut.

5. Take two chenille stems and twist two ends together - approx. ¼". Lay the stems on top of the inside of a finished Wing and bend them into an elliptical shape. At the other end of the Wing, twist the stems together again - approx. ¾". Repeat for the second Wing. Cut excess stems and set aside for later use.

The finished shaped chenille stems should look a bit like cat-eye glasses. Tuck in the ¼" twisted pieces at each wing tip so they will fit nicely into the wings once sewn together. Set aside.

6. Take the finished Wings and pin them together, right sides facing out. Carefully match all sides, especially the bottom edge. Use a whip stitch or blanket stitch to sew from one wing tip to the opposite wing tip. Insert the prepared chenille stems between the two pieces. Tuck the tips of the stems into each of the wing tips to keep the supports in place.

7. Use a few pins to hold the bottom edge of the Wings in place. Whip stitch or blanket stitch the remaining open edges closed.

8. Take both pieces of the Tail and pin together, right sides facing out. With two strands of embroidery floss, sew the pieces together from point A to point B. Knot and clip the floss. Set aside.

You can continue stitching around the edge of the lower portions of the tail, if desired.

9. On the two Body pieces, make marks where the Wings will be attached. Take the Top Back and align with the Body so that point A on each matches. Pin together along the curve of the head. Using two strands of embroidery floss, stitch from point A to where the Wings will be attached. Knot and hide ends. Repeat this step on the other side.

10. Fit the Wings under the Top Back piece and pin in place. Pin one side of the Body to the remaining Top Back piece. Using two strands of embroidery floss, stitch from the Wings to the end of the Tail. Repeat on the other side.

11. After both sides of the Body are stitched to the Top Back, trim any excess felt from the Top Back. Use a single strand of embroidery floss to whip stitch closed the small gap between the Body and Wing. Repeat on the top of the bird.

12. Pin the Bottom Tummy in place from point A to point B. Pinning these pieces prior to sewing may seem like a lot of work, but it’s worth it to get the curves aligned! Use two strands of embroidery floss to stitch together.
13. Repeat step 12 on the other side, stopping to add Polyfil as you stitch. Stuff evenly, using smaller pieces for the head portion. Make sure the stuffing is placed around the internal portions of the safety eyes. Continue stitching and stuffing until the Bottom Tummy is completely attached. Knot and hide ends.

14. Gather the finished Tail, cut pieces of chenille stem, glue and scissors. Twist the two stems together. Open the Tail and place glue inside the center feather. Place the twisted stems into the glue and press closed. Use scissors to make space inside the stuffed tail end of the bird to receive the stems and glue. Gently position the Tail on the bird. Once in place, glue can be added so bottom portions of the Tail are secure.

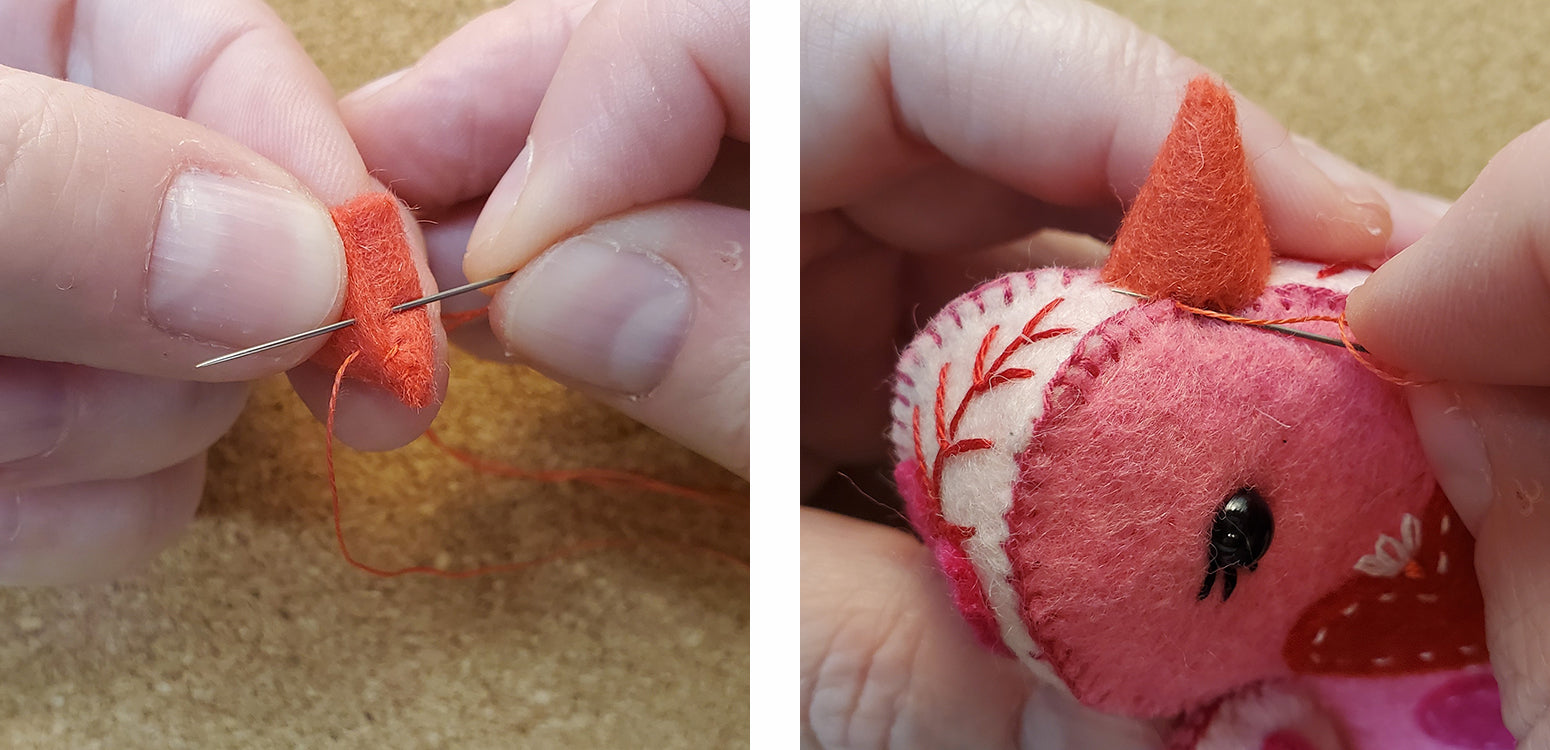
15. To create the Beak, fold the felt into a cone. Start at the inside tip of the Beak and whip stitch down to the base with a single strand of embroidery floss. Add a tiny bit of stuffing so the beak stays conical. With the needle and floss still attached, position the Beak directly over point A on the Body. Pin in place. Attach using a ladder or whip stitch. Knot and hide ends.
Pom pom Hanger
Choose any color, size, and shape combination of pom poms that suits you!
16. Lay out the pom poms and Love Bird in order. Use a double strand of pearl cotton (approx. 40") and a Darner to string the items from bottom to top. Make a loop for hanging at the top. Stitch the extra pearl cotton back through a few of the poms and trim.

Your Love Bird ornament is complete! Wouldn't it be darling as a set? Or perhaps hanging from a mobile? Our favorite part of these tutorials is seeing where your imagination takes you!

Thanks to Katie for designing and writing this tutorial! You can follow her on Instagram @katie_kinsman_artist or visit her website. Stay tuned for more tutorials from the Benzie Design Maker Team!


