
Bespoke means made for a particular person. Maker Team member Laura of @feltlikeaparty reimagined mercury glass and mica glittered heirlooms along with the personalized baubles from her childhood for this holiday tutorial. The results are vintage ornaments with a bit of whimsy! Who will you make one for?
Had you asked me five years ago how I felt about Christmas, you would have gotten a big Grinchy pout with an Ebeneezer “bah humbug.” However, having my boys changed that! The nostalgia of being a kid at Christmas came flooding back with all the magic, wonder and, of course, heirlooms. Little baubles I played with are now in my children’s hands, getting another life and another story. My most cherished gifts from generations past are my grandmother and great-grandmother's ornaments, which we are going to replicate today!
Skill Level: Intermediate
Time: 2 - 3 hours each plus drying time
Additional Supplies:
Iron
Washi Tape
Skewer or Wooden Craft Stick
Parchment Paper
Precision Knife (optional)
Directions:
PATINA ORNAMENT

1. Take a large pinch of Gold iridescent fiber and envelop the extra large Loden pom.

2. Place a piece of parchment paper between the fiber-wrapped pom and iron. Work around the pom. The fibers will mold themselves and shine!

3. Measure out about 2” on the pom and use micro tip scissors to cut an oval from the fiber encasing, exposing the Loden color underneath.

4. Tear off about 6” of Evergreen roving and add a pinch of Gold iridescent fiber. Thoroughly combine by tearing apart the roving, layering it back atop itself and tearing again. Do this until the Gold fibers are mostly even throughout.

5. Place the pom on a felting pad and needle felt the oval opening. Felt both on the Gold fiber encasing as well as the pom. I recommend a 38 gauge star felting needle.

Always felt with the needle facing straight down toward the felting pad. Turn the project to accommodate this. Use many, many repeated stabs that are just deep enough to mesh the fiber into the pom. Mind your fingers!
6. Bespoke time! Use a disappearing ink pen to write a name or letter(s) in your desired style.

7. Take a small piece of Rose roving and needle felt the name or letter into the pom following the guidelines.

8. Cut eight extra small Loden poms in half. Cut a length of embroidery floss and, using two strands of floss, thread the embroidery needle. Add a Rose sequin and bead to each of the pom halves. Thread through the bottom (or flat portion) of the pom, come up and add a sequin, then a bead and pull your thread through. Take the needle back down, missing the bead, and going back through the sequin and pom. Knot the end.

9. Hot glue the bottoms of the poms around the felted oval.

10. Cut a 7 x 1/4" piece of Champagne metallic felt. Cut an additional 3 x 1" piece. Trim the width of the second piece to about 1/2" with the scalloped shears. Roll the 7” section of metallic felt and secure with hot glue. Do not add glue until a small section is rolled.

11. Cut a 12” length of Pearl cotton and thread both ends through the Darner needle. Pull the needle through the center of the rolled metallic felt and knot the end.

12. Hot glue the scalloped piece around rolled felt and affix to the top of the ornament.

MICA WREATH ORNAMENT

1. Place a piece of washi tape around the circumference of the extra large Almond pom. Using a blender sponge, dab the Peony pan pastel on the exposed wool of the pom. Come close, but not all the way, to the washi tape. Repeat with the Magenta pan pastel. The goal is to match the Rose wool roving used in the other ornaments.
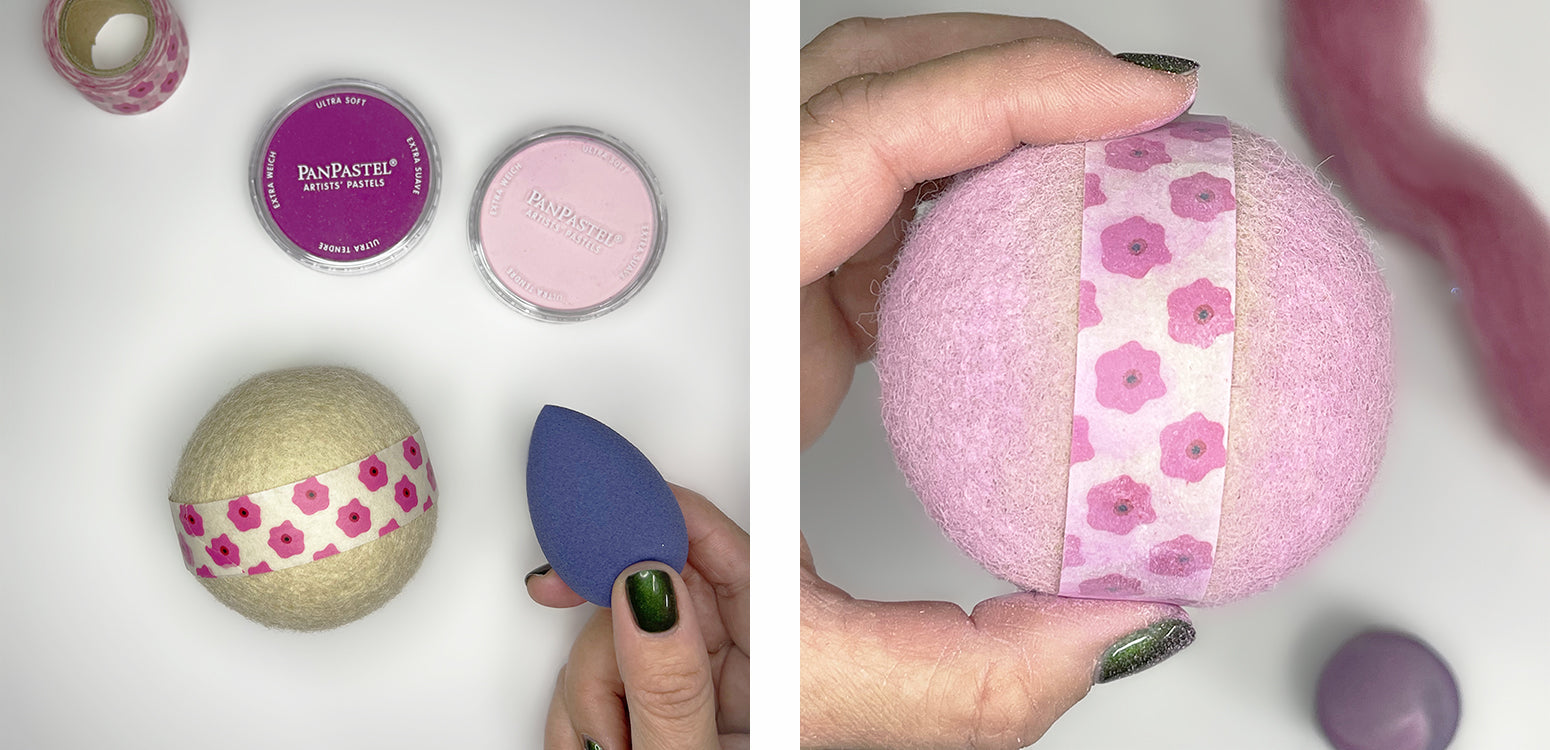
When you are satisfied with the color, spray with Krylon Workable Fixatif following the product instructions. The pom will need time to set. I suggest starting the next ornament and coming back to this one!
2. Cut a 9 x 1” strip of Sherwood felt. Fringe the felt in thin and even increments about halfway deep into the strip.

3. Trim the strip of felt so there is a narrow border between the base of the felt and where the cuts end. Fold the felt in half and cut into two pieces.
4. Use a wire cutter to cut two 2 1/2” wire stems. Use the hot glue gun to wrap the fringed felt around the floral stems and create a wreath bough. Cut away and discard any excess. Repeat for the second stem.

5. Pour tacky glue onto a piece of parchment paper and pour glass glitter on top. Swirl to combine with a disposable craft stick. Use the stick to spread the glass glitter onto the felt boughs. Set aside to dry.

6. Test the pom to make sure it is dry and the pan pastel is set. If needed, apply another coat of Fixatif.
7. Tear off about 6” of Evergreen roving and add a pinch of Gold iridescent fiber. Thoroughly combine by tearing apart the roving, layering it back atop itself and tearing again. Do this until the Gold fibers are mostly even throughout.

8. Bespoke time! Use a disappearing ink pen to write a name or letter(s) in your desired style.

9. Take a thin piece of the carded roving and needle felt into the pom. I recommend a 40 gauge spiral felting needle.

Always felt with the needle facing straight down toward the felting pad. Turn the project to accommodate this. Use many, many repeated stabs that are just deep enough to mesh the fiber into the pom. Mind your fingers!
10. Cut a 12" length of embroidery floss and, using two strands of floss, thread the embroidery needle. Knot the end. Bead the floss with the Rose, Kelly Green and Gold beads. This ornament uses a pattern of (2) Gold + (5) Rose + (2) Gold + (5) Kelly Green + (2) Gold. Repeat until there are 6” of beading.

11. Thread the needle back through the first two gold beads and discreetly knot. Do not pull tight and do not cut the remaining length of floss - you will need it!

12. Cut a 7 x 1/4" piece of Champagne metallic felt. Cut an additional 3 x 1" piece. Trim the width of the second piece to about 1/2" with the scalloped shears. Roll the 7” section of metallic felt and secure with hot glue. Do not add glue until a small section is rolled.

13. Cut a 12” length of Pearl cotton and thread both ends through the Darner needle. Pull the needle through the center of the rolled metallic felt and knot the end.
14. Let’s make a little chandelier around the ornament top! Take the loop of beads and hot glue a bit of floss to the ornament top. Take a section of beads with the pattern (1) Gold + (5) Kelly Green + (2) Gold + (5) Rose + (1) Gold and have it hang from the bottom of the ornament cap. Come back up and hot glue the floss again. Repeat this pattern around the inside of the ornament top.

15. Hot glue the partial ornament top to the pom, careful not to catch any of the beaded loops.

16. Hot glue the scalloped piece around the ornament top avoiding any beads.

17. Take the boughs and cross them at the base. Bend the wire around each other and secure in place under the beaded loops with hot glue.

18. Take two extra small poms and cut them in half. Use three half poms to create the middle of the boughs. Carefully bend the boughs to your liking. The glass glitter is sharp!

REFLECTOR ORNAMENT
1. Draw a 2 1/4" circle on the extra large Almond pom with a disappearing ink pen. Use a precision knife to puncture the pom and cut following the guideline - much like carving the top off a pumpkin!

2. Core the pom. The top layer will be stiff but, as you move toward the center,
the inside will unravel and come out more freely. Use scissors as necessary to clear most of the wool from the center. Set the top and wool aside - you will need some of it later.

3. Cut a length of Pink embroidery floss and, using two strands, thread the small embroidery needle. Knot the ends together so there are four strands of floss to support the embellishments.

4. About ½” from the opening in the pom, layer a Pink cupped sequin, a flat Rose sequin and a Rose bead. Sew in place by missing the seed bead and only going back down through the sequins. Repeat two more times to make a berry bunch as pictured. Repeat on the opposite side of the pom.

5. Take a pinch of the wool and place it back in the pom.

6. Take the removed top of the pom and place it back into the opening until it sits below and inside the outer wall, leaving about ½” of 'inside wool' exposed.

7. Place the pom atop a felting pad and tear off 16” of Rose roving (1" thick.) Place the roving around the 'inside wool' and needle felt from the center outward. I used a 38 gauge star needle for this project. Needle felt until the pom is one solid piece. It should now have a concave-like indentation with a felted pink rim.

Always felt with the needle facing straight down toward the felting pad. Turn the project to accommodate this. Use many, many repeated stabs that are just deep enough to mesh the fiber into the pom. Mind your fingers!
8. Tear off about 6” of Evergreen roving and add a pinch of Gold iridescent fiber. Thoroughly combine by tearing apart the roving, layering it back atop itself and tearing again. Do this until the Gold fibers are mostly even throughout.
9. Use the disappearing ink pen to draw two holly leaves coming from the sequin berries.

10. Take a thin piece of the carded wool roving and needle felt the holly, starting with the outside and following the guidelines. Once the border is felted, bring the roving to the center and complete the holly. Repeat for the other leaf.

11. Repeat steps 9 and 10 for the other side of the pom.
12. Lay out a piece of parchment paper and create a nest of Gold fiber. Be sure the fibers are not in a uniform direction.

13. Fold the paper in half. Use an iron and press for a few seconds. Open to reveal a shiny sheet of fiber! Trim the edges with scissors.

14. Cut a 1 1/2" square of freezer paper. Write the desired letter on the non-glossy side of the freezer paper. Be sure the letter has a thickness so it can be cut out.

15. Place the freezer paper on top of the fused fiber sheet and press with iron. It only takes a quick moment to bond the freezer paper to the fiber. The radiant heat will remelt any uncovered portions of the fiber sheet, so work quickly. Cut out the letter and set aside.

16. Cut a 7 x 1/4" piece of Champagne metallic felt. Cut an additional 3 x 1" piece. Trim the width of the second piece to about 1/2" with the scalloped shears. Roll the 7” section of metallic felt and secure with hot glue. Do not add glue until a small section is rolled.
17. Cut a 12” length of Pearl cotton and thread both ends through the Darner needle. Pull the needle through the center of the rolled metallic felt and knot the end.
18. Hot glue the scalloped piece to the top of the ornament.

19. Secure the letter to the middle of the ornament with a small amount of E6000 glue. Be sure it is completely dry before proceeding to next steps.

20. Lay out another piece of parchment paper and spill out some glass glitter. Line the rim of the ornament with tacky glue. Flip the ornament over and touch the tacky glue to the glass glitter. Please proceed with caution as the glass glitter is extremely sharp.
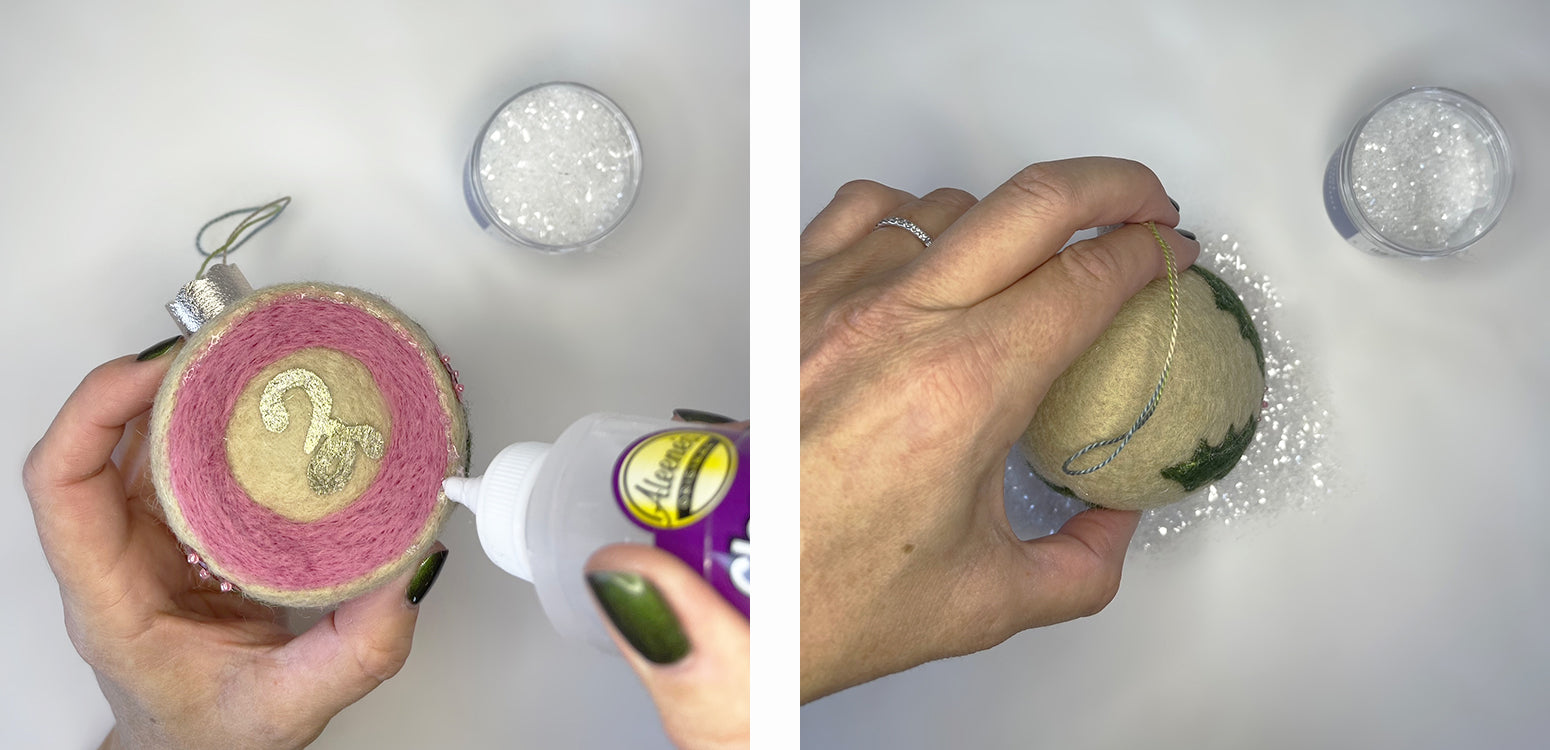
21. Set aside for 12 hours to allow glue to cure.

I hope this brings back some nostalgia for you and I wish you a very Merry Christmas from my family to yours.

Thanks to Laura for designing and writing this tutorial! You can follow her on Instagram @feltlikeaparty or visit her website. Stay tuned for more tutorials from the Benzie Design Maker Team!


