
Welcome to Christmas in July with Benzie Design + Therm O Web! We're sharing fabulous holiday-themed tutorials all week, along with an exclusive discount code and chance to win gift cards from Benzie and Therm O Web. Find the details at the end of this Festive Checkboard tutorial designed by Maker Team member Amy of @mikelmichelleco.
This festive checkerboard is sure to bring hours of entertainment for years to come! The design incorporates double-sided peppermint game pieces, so you can flip them to turn each into sparkling royalty once kinged. Plus, this Winter Mint (Palette) candy board can be used on the go because Benzie Design’s wool blend and glitter felt stick to each other. When you are planning your holiday travels, leave a little room in your carry-on!
Skill Level: Beginner / Intermediate
Time: 4 hours + some extended drying time

Supplies:
9x12" Winter Mint Wool Blend Felt Palette
One 12x18" sheet of Olive Wool Blend Felt
One 9x12" sheet of Red Glitter Felt
One 9x12" sheet of White Glitter Felt
One 9x12" sheet of Gold Glitter Felt
One yard of Peppermints Woven Ribbon
Scissors
Iron
Ruler
Therm O Web iCraft Fabric Fuse Liquid Adhesive
Therm O Web SpraynBond Fusible Adhesive Fabric Spray
Therm O Web Heatnbond UltraHold Iron-On Adhesive Roll
Therm O Web SpraynBond Fabric Stiffener Spray - Optional
Checkerboard Pieces Pattern PDF (Click to download)
Directions:
1. Print the Checkerboard Pieces Pattern above onto cardstock and cut out stencils.
2. Using the stencils, trace and cut out:
2 Pockets in Sage Wool Blend Felt
12 Circles in Red Glitter Felt
12 Swirls in Red Glitter Felt
12 Circles in White Glitter Felt
12 Swirls in White Glitter Felt
12 Circles in Red Wool Blend Felt
12 Swirls in Crimson Wool Blend Felt
12 Circles in Jadeite Wool Blend Felt
12 Swirls in Julep Wool Blend Felt
If using a die cut machine, cut using a circle die 1.25" in diameter. This will allow you to cut each circle/swirl listed above as circles and THEN use the swirl stencil to create the peppermint pattern. Cut the remaining portion with scissors and save your hands quite a bit of work!

If you would like to go the more traditional route of stacking your pieces to dub them Kings, you can cut your game pieces in half by making two sets that are single-sided. Just be sure to use a firming agent like Spraynbond Fabric Stiffener Spray to ensure your peppermint pieces keep their shape. Another awesome option for minimizing your crafting time is to use Benzie's Felt-fetti circles as game pieces.
3. Measure out a 10x10" square of the Heatnbond UltraHold Iron-On Adhesive Roll. Once cut, place the square (protective paper side up) onto the 12x18" sheet of Olive wool blend felt. Leave about a 1" space from the left, top and bottom sides. Following Therm O Web’s instructions, run an iron (without steam) in a circular motion over the 10x10" piece to bond it to the felt.

4. Next, use scissors or a rotary cutter and ruler to create the 1.25" squares needed for the checkerboard. Make sure that the starting edge is straight so that the squares are cut evenly. Cut one 1.25x9" strip of each shade: Crimson, Red, Strawberry, Coral, Grapefruit, Linen, Jadeite, and Julep. Additionally, cut five 1.25x9" strips of Gold Glitter felt.

5. Cut strips into squares measuring 1.25" wide. This will yield the necessary four squares for each wool blend felt shade listed above, as well as the 32 squares of Gold Glitter felt to create the 10x10" checkerboard design. Using a rotary cutter (and a bit of confidence) allows for the stacking of strips to minimize cutting time. I cut the glitter felt one strip at a time and the wool blend strips two at a time.

6. Peel the protective layer from the Heatnbond UltraHold Iron-On Adhesive Roll piece and carefully place the 1.25" squares. Each row will alternate between a Gold Glitter square and a square from each wool blend felt, using the same shade per row. Press the squares in place as you continue to add to the board.

After the first two rows, I lined up my squares along the side to ensure that the 10x10" adhesive square would be completely concealed.

7. Once all squares are placed and initially pressed, go back over the board again pressing down firmly to allow the heat to penetrate the felt. Continue pressing the felt until all pieces are nice and flat. The Gold Glitter squares should basically be the same thickness as the wool blend felt squares.

Flip the 12x18" Olive sheet over and firmly press the back.

8. Once cooled, roll the board to check for any spots that may be lifting up. If any squares are not adhered, repeat Step 7.

9. Position the two pockets along the right side of the checkerboard. While holding each in place, fold the pocket over about hallway and apply the Fabric Fuse Liquid Adhesive along the side and bottom edges. Lightly press into place. Pocket openings are positioned away from the checkerboard pattern, so that the first section of the 12x18" Olive felt sheet acts as a closure when rolled up.

10. Returning to the peppermint game pieces, lay the Red and Jadeite felt circles onto a protected surface and use the SpraynBond Fusible Adhesive Fabric Spray to coat the exposed sides. If the force of the spray moves the felt circles, painters tape over the parchment paper will help to keep them in place.

11. Once dry, place the coordinating shades on top of these sprayed pieces. Adhere by pressing the iron (without steam) onto both sides of the game pieces while moving in a circular motion.

12. Apply the Fabric Fuse Liquid Adhesive to the backsides of the peppermint swirls and carefully place them onto the coordinating circle pieces:
Crimson felt swirls on White Glitter
White Glitter swirls on Red felt
Julep felt swirls on Red Glitter
Red Glitter swirls on Jadeite felt
The swirls can also be bonded using the Spraynbond Fusible Adhesive Fabric Spray from Step 10.

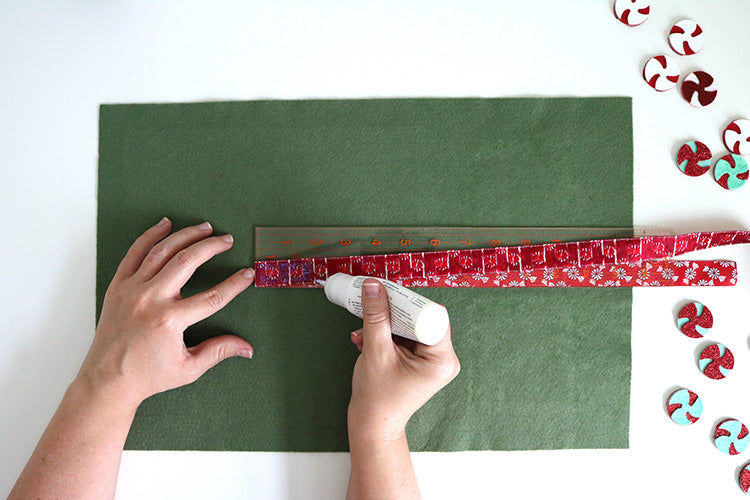
13. Finally, attach the Peppermints ribbon. To keep the ribbon ends from fraying you can apply a no-fray liquid or very carefully seal the ends using a lighter. Flip the checkerboard over so that the back side is facing up and center the ribbon on the back. Pull the ribbon past the felt sheet on the right side by about 3.5".

Use the Fabric Fuse Liquid Adhesive to glue a 4" portion of the ribbon onto the left side of the felt sheet, beginning 1" from the left side. Once dry you can roll this checkerboard up and tie it closed for easy storage and portability.

Woohoo, you’re done! Stretch out those hands and ready yourself for a round of peppermint checkers. Thanks so much and have fun creating!


Thank you Amy for designing and writing this tutorial! You can follow her on Instagram @mikelmichelleco or visit her website.
And a special thanks to Therm O Web for supplying the adhesive materials for this project. Please enjoy an exclusive 10% discount on one purchase at thermoweb.com. Cannot be combined with other offers, nor valid on new or sale items. Good thru Dec.31, 2021. Enter 'BENZIEFELT1021' at checkout.
You can also enter your information below for a chance to win a $45 gift card. Look for more chances to win and more holiday projects all week on the Therm O Web blog.


