
We are pleased to bring you this first project from new Benzie Design Maker Team member Jess of @otterbeestitching. Jess uses vibrant colors and bold shapes to make whimsical fiber art for every age. And those of you already familiar with her work know that she is a fabulous teacher. We are so excited to have her join our Benzie Team!
Summer is just around the corner and we all know what that means! Gardens will be blooming, farmer’s market stands will be opening and we’ll be filling our fridges and pantries with vibrant fresh produce. If you’re a parent of young kids, you already know that imaginative play is a great way for children to imitate real life experiences and this farmer’s market bag and produce set is the perfect addition to any play kitchen. Felt beets, carrots and strawberries bring bold summer hues indoors and a life-like paper bag is perfect for carrying everything from room to room. Let’s get started!
Skill Level: Beginner
Time: 6 - 8 hours (depending on amount made)
Additional Supplies:
Produce Pattern (click to download)
Directions:
Begin by printing pattern above and cutting all pattern pieces from felt. There are five Strawberries, three Carrots and two Beets in example photos. For Market Bag, cut the following from Toast felt:
(2) 8 x 11" Front and Back Panels
(2) 4 x 11" Side Panels
(1) 4 x 8" Bottom Panel
(2) 1 x 8" Handles
STRAWBERRY
1. Pin together two strawberry halves. Use one strand of coordinating floss to stitch a running stitch around outer edge, leaving top open. Do not tie off thread.

For this entire pattern, you will be working with a single strand of floss for each step. I recommend threading the needle and tying thread ends in a knot. This will keep the needle from slipping out inside the pieces.
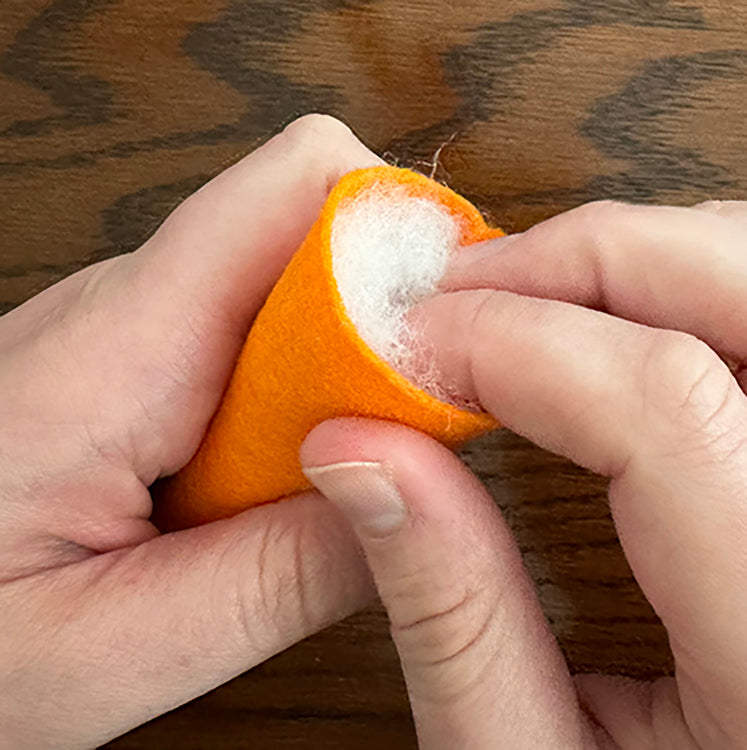
2. Turn strawberry right side out. Add Polyfil until filled to top and firm to the touch. Hold Polyfil in place with non-dominant thumb and continue running stitch around top of berry, cinching thread as you go. When top is fully stitched, pull thread tight and tie off.

3. Use one strand of White floss for strawberry seeds. Bring floss through open top and out at top of first seed. I like to begin in the upper left portion and work top to bottom and left to right. Bring needle down through bottom of seed and out through top of next seed. Continue scattering seeds in this way until strawberry is covered to your liking.

4. Once seeds are finished, bring needle out near top of berry. Tie off by threading needle through a small bit of felt and pull through until there is a small loop left. Thread needle through loop to make a knot. Put needle back through near knot and out at random point on strawberry. Pull tight and trim thread close.

5. Position leaf piece over top of berry. Make sure points are even on all sides - or leave irregular for an organic look. Use one strand of coordinating floss to whip stitch leaf all the way around. Bring needle up through point of first leaf section and tuck thread tail out of sight under leaf. Bring needle down through strawberry (level with top of stitch in leaf) and back up through leaf. Continue stitching in this manner all around leaf, checking periodically that alignment is satisfactory.

6. Tie off at bottom of last stitch. Weave needle under a small bit of strawberry, at a point level with top of stitch. Pull thread taut until there’s a small loop left, and thread needle through loop to make a knot. Bring the needle down near knot and out at a random point on strawberry. Pull tight and trim excess thread.

7. Repeat steps above to make additional strawberries.
CARROT
1. Lay carrot piece so short side is at the top and fold vertically, lining up two long sides. Pin in place. Use one strand of coordinating floss to stitch a running stitch up long side of carrot, stopping about 1/2" from top.

2. Trim point at an angle so there isn’t much felt beneath stitches. Fold carrot so seam is in center back. Top of carrot will be higher in back - trim top so it is level all the way around. Turn carrot right side out. You may need a stuffing tool to get point fully turned.

3. For carrot top, position leaves in center of top piece. Once satisfied with their position, remove one leaf and lay other flat. Use one strand of coordinating floss to stitch a running stitch along bottom edge of leaf. Position second leaf and stitch similarly.

4. Add Polyfil to carrot, using a stuffing tool to get it into the point. Use small amounts of stuffing to fill evenly.
5. Position top and blanket stitch in place. Bring needle up through carrot top to start. Next, bring needle through carrot base and same exit point on top. Pull until there is a small loop left, and thread needle through loop. Pull tight. Continue making stitches through base and top, making sure to thread your needle through loop of thread before pulling tight, all around the seam.

6. With 1" left to stitch, add a bit more Polyfil so carrot is stuffed fully. Continue stitching seam closed and tie off.

7. Repeat steps above to make additional carrots.
BEET
1. Line up two adjacent sections of beet (let’s call them sections A and B), right sides together. Pin in place. Use one strand of coordinating floss to make a running stitch along length of seam. Only stitch adjacent edges together in this step. Tie off at end of seam.

2. Remove pin and line up sections B and C, right sides together. Make a running stitch up length of seam connecting two sections and tie off. Repeat this step to connect section C to D and section D to A.

3. Turn bowl shape right side out and fill with Polyfil. Once beet is ⅔ full, use one strand of coordinating floss to stitch a running stitch along top edge of beet, cinching thread as you go. Add Polyfil as top begins to close and beet is stuffed fully. Once entire top edge is stitched, pull thread tight and tie off. Don’t worry if opening at top of beet seems a bit large.

4. Cut a small X in center of beet top piece by folding in half and making a small snip, then folding in half opposite way and making another small snip. Whipstitch beet top to beet. Bring needle up through beet top for first stitch. Bring needle down through the beet, level with top of stitch, and back up through beet top. Continue stitching this way all around beet top.

5. At last stitch, tie off by weaving needle through a small chunk of beet, level with top of stitch. Pull through until you have a small loop left, and thread needle through loop. Pull tight. Bring needle down near knot and out at random point on beet. Pull tight and trim excess thread.

6. To make a beet leaf, position vein so it is centered and lines up with bottom edge of leaf. Pin in place. Use one strand of coordinating floss to make a running stitch along right and left sides. Leave bottom edge unstitched. Tie off.

7. Use Frixion pen to draw veins on leaf. Be sure bottom set of veins is near top point of vein. This will be helpful when we stitch veins in a moment.

8. To stitch veins, use a variation on a running stitch to create identical stitches on front and back of leaf. Use a long piece of floss (about 3') so you don’t have to rethread in the middle. Begin by bringing needle up through top point of beet vein, tucking thread tail beneath vein. Bring needle down at joint of bottom set of veins.

9. Bring needle up at far end of right vein and down at joint at base. Bring needle up at far end of left vein and down at same joint. Bring needle up a stitch length away, and continue with a running stitch.

10. At next joint, bring needle up at joint and down at far end of right vein. Bring needle back up at joint and down at far end of left vein. Bring needle up at joint and continue with a running stitch.

11. Repeat step 10 at final joint. Continue with a running stitch until you reach end of center vein.

12. At top, stitch a running stitch back down length of center vein, filling in empty spaces with stitches. Check that stitches are lined up on both sides of leaf so lines are straight. Bring needle up at base of top stitch and down at top of second stitch. Continue with running stitch, filling in blank spaces along center vein, until you reach top of beet vein.

13. To tie off, weave needle under two to three stitches on backside of leaf and between layers of leaf and beet vein. Pull needle tight and trim flush with leaf.

14. Repeat steps 7-13 two more times, for a total of three beet leaves. Erase pen guidelines with a hair dryer before moving on.

15. Fold down top 1/4" of a pipe cleaner and press tight. This hides end of wire to make inserting the pipe cleaner easier. Insert pipe cleaner into bottom of leaf, between vein and leaf layers. Push gently to end of vein. Repeat for other two leaves.

16. Trim bottom of pipe cleaners so 1 1/2 - 2" are sticking out of bottom of each leaf. Insert pipe cleaners into center of beets, through the hole you cut in top piece.

17. Whipstitch beet veins to top of beet the same way you did in step 4. Tie off thread.
18. Repeat steps above to make additional beets.
MARKET BAG
1. Use Frixion pen to draw a horizontal line ¼” from top of front, back and side panels. Use pinking shears to cut along line, lining up base of the teeth with line. Erase any guidelines with a hair dryer before continuing. The example bag was not ironed to make it look crumpled and well-used. If you would like a crisp bag, iron before using Frixion pen.

2. Line up front and side panel, wrong sides together, and pin. Use one strand of coordinating floss to blanket stitch seam. Bring needle up through top layer of fabric, then up through both layers of fabric. Pull thread taut until you have a small loop left, and thread needle through loop. Pull tight. Make next stitch by coming up through both layers of felt. Pull thread taut until you have a small loop left, and thread needle through loop. Pull tight. Continue making stitches in this way along length of seam. Tie off.

3. Repeat step 2 to join back and side panel. Your bag should look like this when laid out:

4. Position bottom panel, lining up edges with three sewn sides, and pin. Blanket stitch bottom panel to front, side, and back panels. Remember to stitch on right side (outside) of bag - there will be no turning for this piece!

5. Position second side panel, lining up edges with front, back and bottom, and pin. Blanket stitch second side panel along all three seams. The main portion of your bag is now complete!

6. Position front handle and pin. Be sure same side of handle piece is touching front panel at each end so handle isn’t twisted.

7. To secure handle, use a box stitch. A box stitch is six straight stitches forming a square with an X through the middle. Bring needle up through handle and front panel in bottom right corner of box. Bring needle back down through top right corner.

8. Bring needle up through top left corner and down through top right corner.

9. Bring needle up through bottom right corner and down through bottom left corner.

10. Bring needle up through top left corner and down through bottom left corner.

11. To make X in center, come up through bottom right and down through top left. Bring needle up through top right and down through bottom left corner. Tie off.

12. Repeat steps 7-11 for other side of handle.

13. Line up second handle and pin to back panel. Repeat steps 7-11 to secure both ends with box stitches.
Congratulations, you’ve successfully completed your farmer’s market bag and produce!

This project is definitely worth celebrating after all the love and care you’ve put into it. Although I’ve only included instructions for three fruits and veggies, you could absolutely make others, or make different amounts. You could even make a custom label for your paper bag. The possibilities really are endless and we can’t wait to see how you make this project your own!

Thanks to Jess for designing and writing this tutorial! You can follow her on Instagram @otterbeestitching or visit her website. Stay tuned for more tutorials from the Benzie Design Maker Team!


