Share

Have you noticed the increasing popularity of Halloween? It is certainly a favorite within our crafting community! Maker Team member Jenny of @olivethisfelt is adding her personal touch with a holiday applique tutorial. We promise it's only a little corny...
I have a kitschy knick-knack from my great grandmother that lives proudly in my studio. It has four nuts in shells perched on top of a small wooden block base. Each nut has a pair of googly eyes, although two now have just one eyeball each. The wooden base reads “WE’RE ALL NUTS” in crudely drawn marker. I’m sure most people would pitch it and not think twice but, for me, it’s more than a dusty block of wood. It’s a reminder of the quirkiness in us all and that we are more alike than we are different. This unusual keepsake inspired this tutorial. I set out to create a felt appliqué project that is a little more polished but still fun. Who knows? It just might become an heirloom that your great grandchildren cherish!
Skill Level: Intermediate
Time: 3 - 4 hours

Additional Supplies:
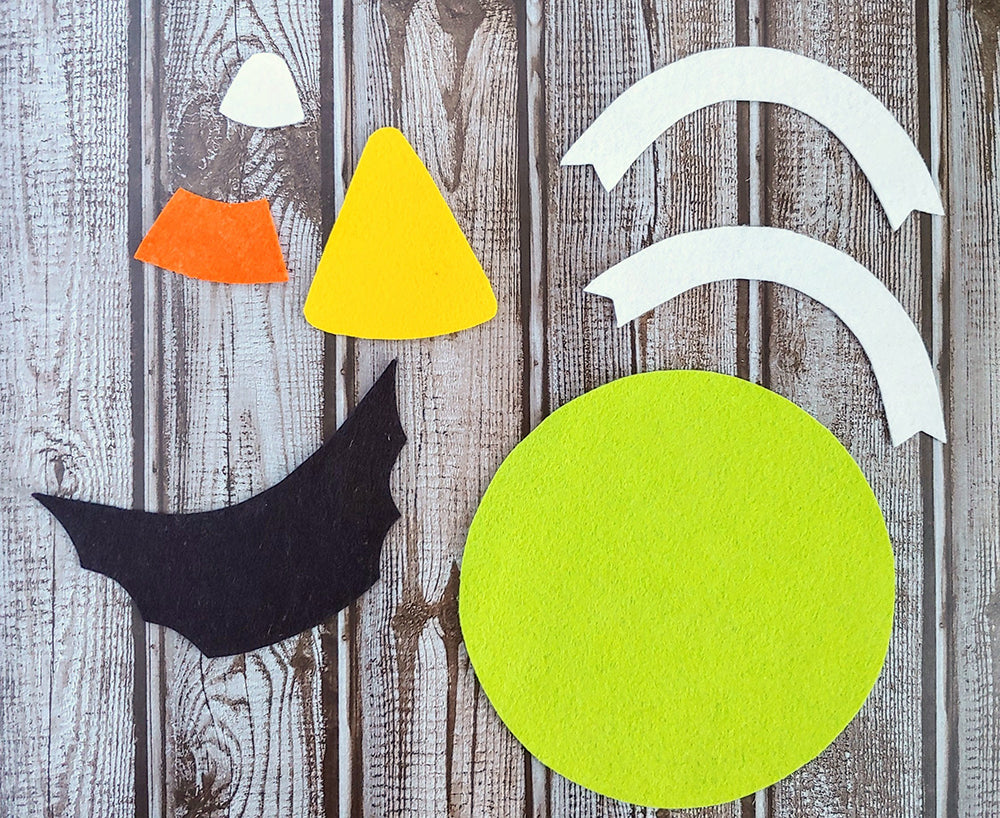
Candy Corn Pattern (click to download)
Iron (or hairdryer)
Ruler
Directions:
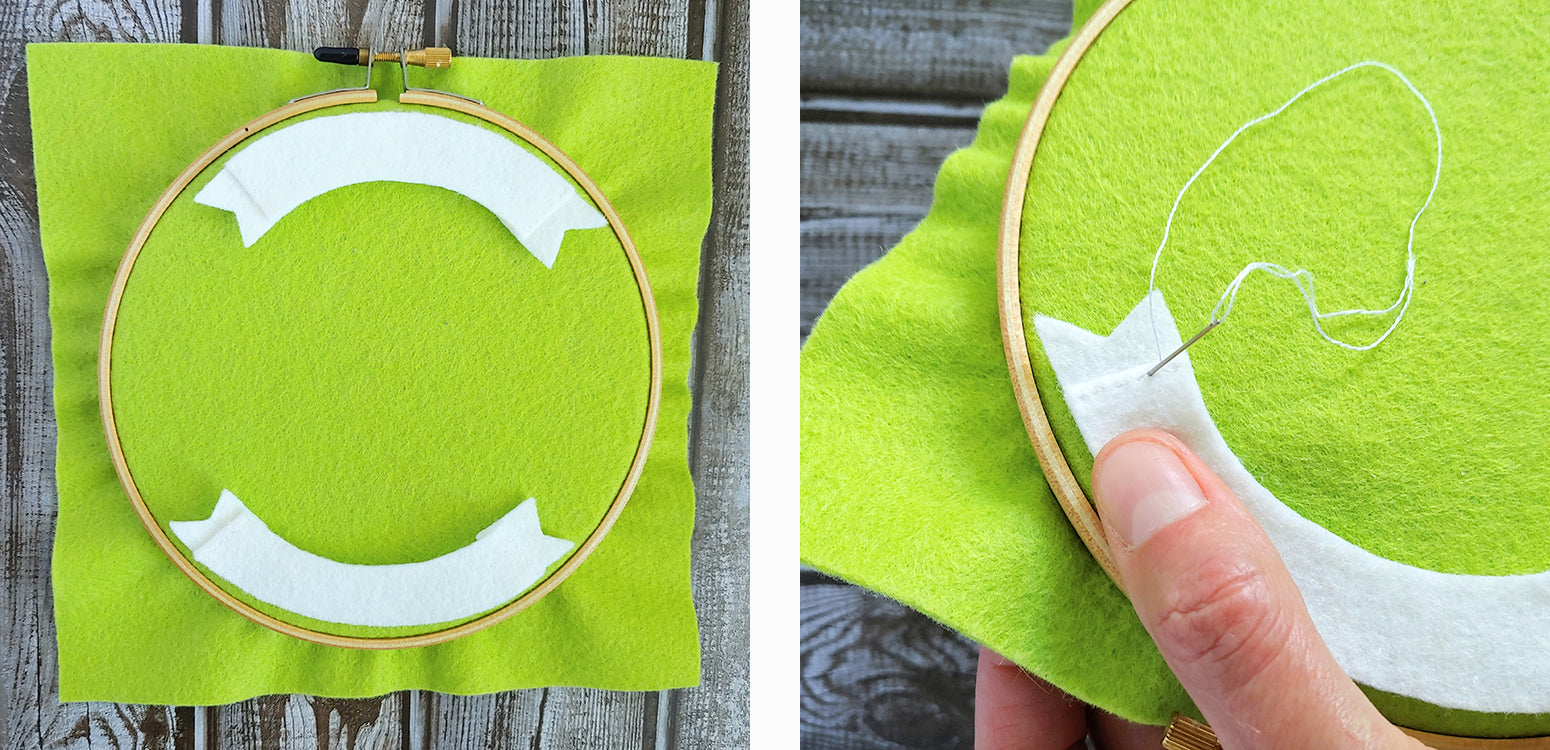
1. Cut an 8 x 8” square from the Chartreuse felt. Position in the embroidery hoop and tighten with screw top to keep taut.

2. Print Candy Corn pattern above and cut out. Use the Frixion pen (and water soluble pencil on Black felt) to trace pattern pieces onto corresponding sheets of felt. Cut out along trace lines. Remove pen marks with iron (or hairdryer) and water soluble pencil by rubbing gently with a wet rag.
3. Take one White ribbon banner and fold one end inward so that it stacks like an accordion. The fold should be about 1/2" wide and three layers thick. Use one strand of DMC B5200 to stitch down the folded end with a running stitch. Be sure to stitch along the edge closest to the forked part of the ribbon. Repeat this process on the other side of the banner. Then repeat on the second ribbon banner to create two completely folded and stitched banners.

4. Center ribbon banners so that one is at the top of the hoop facing down, like an n, and the other is at the bottom of the hoop facing up, like a u. Using one strand of DMC B5200, sew running stitches between running stitches from previous step.
5. Position bat wings in between the ribbon banners. Use one strand of DMC 310 to secure with a running stitch.

6. Place Dandelion candy corn piece over bat wings, in the center. Use one strand of DMC 725 to secure with a running stitch.

7. Position Marigold candy corn piece in the middle over the Dandelion piece. Use one strand of DMC 740 to secure with a running stitch. Then place White candy corn piece over the Dandelion piece, at the very top. Use one strand of DMC B5200 to secure with a running stitch.

8. Using the Frixion pen, draw two sleepy eyes on the Marigold section of the candy corn. I used a short, wide u shape. Using two strands of DMC 310, sew a running stitch over guidelines. After sewing, remove any remaining pen marks with an iron or hair dryer.

9. Time to create those cute little cheeks! Use three strands of DMC 3716 to make a french knot under and slightly to the outside edge of each the eye.

10. For the fangs, draw two small upside down triangles along the seam where the Marigold and Dandelion felt meet. Position triangles so they are in line with the inside of the eyes. Use two strands of DMC B5200 to fill in with a satin stitch. It is easiest to start stitching from the longest point of the fang and work towards the outside of one side and then stitch the other side. Repeat for other fang.

11. Then, use one strand of DMC 310 to create a running stitch outline around the fangs.

12. Write “Sometimes Corny” across the top banner. I chose to stick with simple capital letters, but you can do a fancier font, if you prefer. Use two strands of DMC 310 and a split stitch to go over the guidelines. A split stitch is good for following curves of fonts and make stitches look more polished.

13. Repeat step 12 for the bottom ribbon banner, but write “Always Batty” across it. Remove remaining pen marks with an iron or hair dryer.

14. To give the piece a more finished look, it’s time to back the hoop. Trim the excess felt, leaving a couple of millimeters exposed. Attach the Chartreuse felt circle to the felt lip on the back using a blanket stitch and one strand of DMC 907. Knot and cut excess thread.

Give yourself a pat on the back! You not only finished an adorably quirky appliqué hoop, you mastered four different stitching techniques. Now hang it proudly for all to see. And who knows, maybe, just maybe, it will become a treasured heirloom!

Thanks to Jenny for designing and writing this tutorial! You can follow her on Instagram @olivethisfelt or visit her website. Stay tuned for more tutorials from the Benzie Design Maker Team!


