Share
Mother's Day is one month away. We don't want you to panic but we don't want you empty handed either! Maker Team member Jenny of @olivethisfelt is here to save the day with a gift idea for literally every mom. Just when you thought the perfect gift didn't exist...
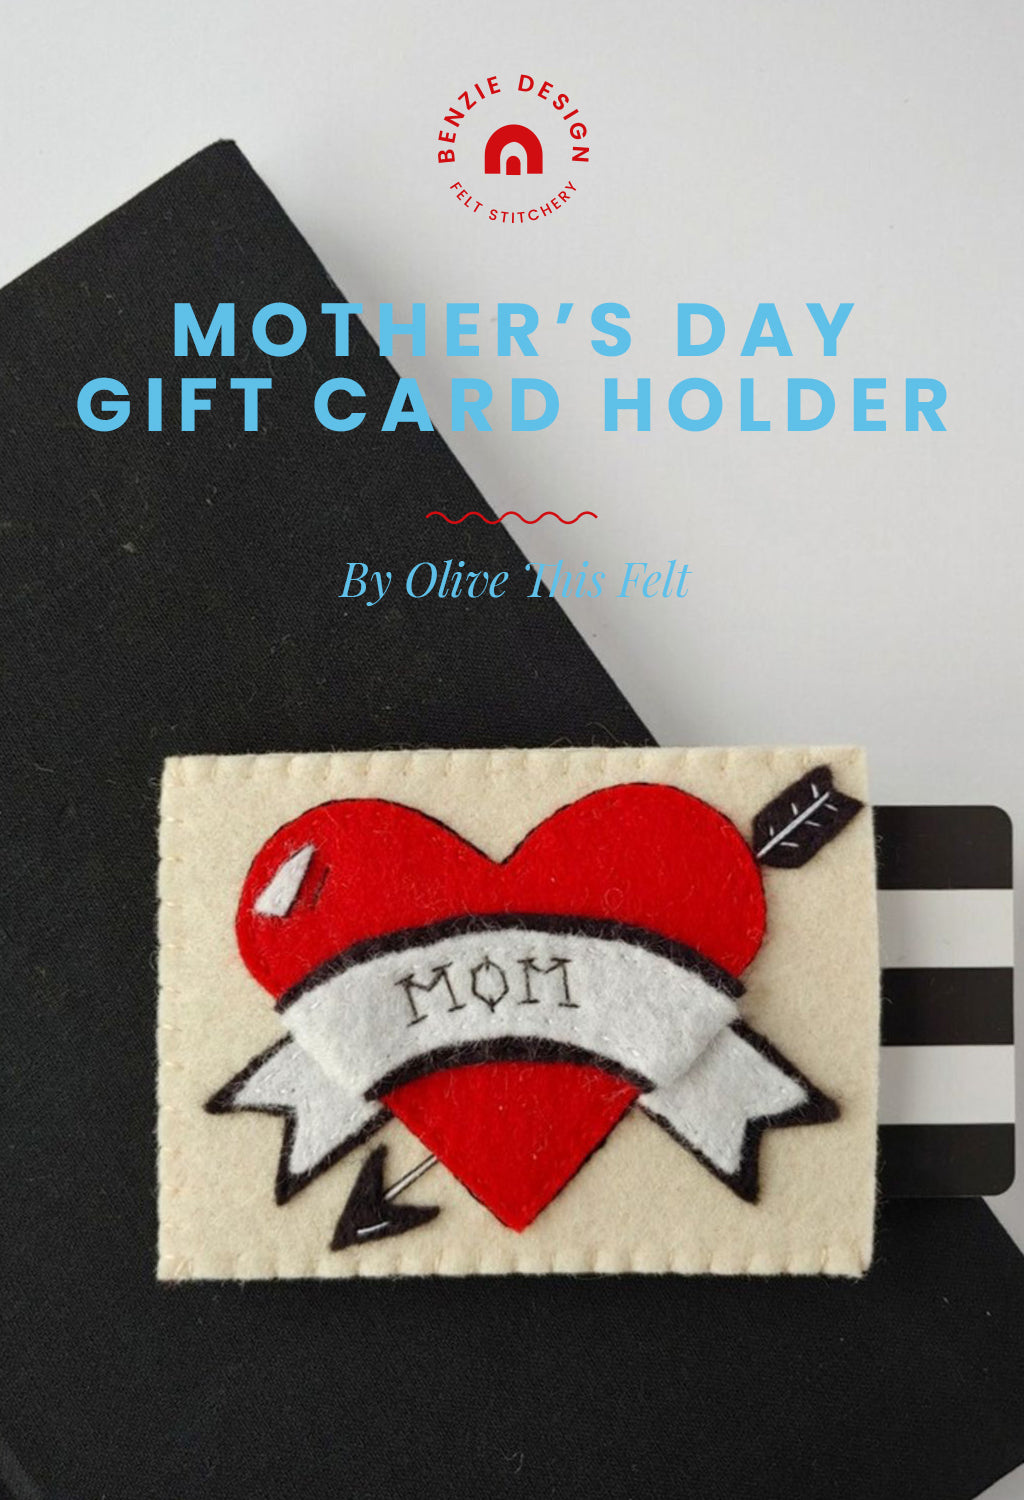
It’s a rite of passage in motherhood to get macaroni necklaces and coupons for free hugs on Mother’s Day. And while they are sweet sentiments, sometimes moms want something a bit more practical…like a gift card to their favorite store. Next to handmade pasta jewelry, a gift card may seem impersonal. Luckily, with this cute gift card holder, you can give any mom the best of both worlds - something thoughtfully handmade and perfectly pampering!
Skill Level: Intermediate
Time: 1 - 2 hours
Additional Supplies:
Mother’s Day Gift Card Holder Pattern (click to download)
Iron (or Hairdryer)
Directions:
1. Cut out all pattern pieces. Trace onto corresponding felt sheets using Frixion pen (and water soluble pencil for Black felt.) Cut out felt pieces. Use heat (iron or hairdryer) to remove pen marks and gently wipe off water soluble lines.

2. Using one strand of B5200, stitch white ribbon pieces onto black ribbon pieces with a simple running stitch.

3. Take the large section of ribbon that will cross over the heart. Using one strand of DMC 310, stitch along the black section with a running stitch. Tuck the overhanging ends of the ribbon over each side of the heart as you continue to stitch down. This should make the ribbon look as though it is fully wrapped around the heart.

4. Using one strand of DMC B5200, attach the small white reflection mark onto the upper left side of the heart with a running stitch.

5. Position the ribbon tails onto the top section of the gift card holder, spacing so that there is space for the heart to lie over them but slightly above them. Put heart off to the side so you can stitch down ribbon tails with one strand of DMC 310 and running stitch.

6. Reposition heart back over ribbon tails. Using one strand of B5200 and a running stitch, sew down the ends of the ribbon that wrap around the heart of the heart. Bring needle out to the side, parallel to card holder top, so that stitches are hidden and tucked under the ribbon.

7. Take one strand of DMC 817 to stitch down the perimeter of the heart to the top of the gift card holder with a running stitch.

8. Place arrow end in upper right hand corner against the heart edge, and arrow tip below the left ribbon tail, slightly away from heart edge. Using one strand of DMC 310, attach arrow tip and arrow end with a running stitch.

9. Make a small mark with Frixion pen below the white felt heart reflection. Use one strand of DMC 310 to create a single stitch over the frixion marking. Remove mark with heat.

10. Using the Frixion pen, write “MOM” across the center of the ribbon that covers the heart. Taking one strand of DMC Black Diamant, use a back stitch to sew over pen marks. Then, continuing to use one strand of DMC Black Diamant, create serifs on each letter. Remove marks with heat.

11. Taking one strand of B5200, add a single stitch along the bottom of the arrow tip to make it look like a reflection mark. Then use the same thread to add detail on the arrow end. Create three “V” shapes pointing downward, making each “V” with two single stitches coming together at a point. Then using two strands of DMC B5200, sew one stitch that runs through the middle of the of each “V”, and the length of the arrow end. Use the same thread to create one stitch connecting arrow tip to edge of heart.

12. Take one strand of DMC Black Diamant to outline either side of the arrow stitching just made with two strands of white thread. Use the same thread to outline the the white reflection mark on the heart.

13. Using two strands of DMC 310, create a stem stitch around the outside of the heart. Do not stitch around the ribbon that tucks under the heart but skip over and continue around the heart.

14. Place the bottom gift card holder piece under the completed top, making sure the knotched out side is lined up with the arrow end of the top piece. Pull aside two strands of DMC 712. Starting at the one end of the gift card holder (being sure to leave the knotched side completely unstitched), bring the needle up between the top and bottom pieces of the thick felt, ensuring the knot is hidden between both pieces. Blanket stitch around three sides of the gift card holder. At the end of the third side, knot off and snip excess thread.

Your Mother’s Day gift card holder is complete! All that is left to do is add a little surprise inside. And don’t forget, this little holder can be refilled or even given as a small wallet or business card holder!


Thanks to Jenny for designing and writing this tutorial! You can follow her on Instagram @olivethisfelt or visit her website. Stay tuned for more tutorials from the Benzie Design Maker Team!


