
Making felt flowers is one thing. Making felt flowers look realistic is another thing entirely! We are so fortunate to have Maker Team member Astrid of @treehousefeltflowers at the ready with her many tips and tricks for making gorgeous, realistic felt flowers. You can find several of her tutorials on our blog. Now Astrid is going in depth with a two part series about adding color and dimension to your felt blooms and we are bursting with excitement!
“How do I make felt flowers look less two-dimensional? How do I make felt flowers look more realistic?” These are two questions I often see on online felting forums. I think the answers to these questions lie in adding color and dimension to the felt. There are a number of ways to add color to felt. If you try using one or more of the techniques in this tutorial, you will see your felt flowers start to come to life!
Skill Level: Beginner to Advanced
Time: Varies
Additional Supplies:
Alcohol Markers
Acrylic Paint
Watercolor Paint
Paint Brushes, small
Eye Make-up
Paper Towel
Color Placement
Where do you place the color on the flower? To start, look at examples of real flowers. At first glance this Day Lily from my garden appears simply yellow, but upon closer inspection, you see subtle color differences and shading that give the flower depth.

The petals are a beautiful soft yellow - perhaps Benzie wool blend felt color Butter or Lemonade. I often find myself guessing comparable felt colors to flowers in nature. Look closer at the tips of the three largest petals. They have a soft blush of pink along the ruffled edges. Now follow one petal from the tip to the center. Notice how the yellow intensifies as you get closer to the center, where the darker yellow starts to turn subtly green.
Below are three felt versions of the Day Lily. All 18 pieces of felt used to make these three flowers are the same size and shape. The flower on the left has no added color or dimension. The center flower looks a bit better and has some coloring. The flower on the right is a combination of adding color and dimension.

Let’s look at some methods to color felt. All methods are done on individual petals before gluing the flowers together. Be sure to practice on a scrap of felt before trying any coloring method on your petals. Finding the right look takes some experimentation and practice, so have fun with it!
Color Techniques
Pastels - One of the most common methods to add color to felt is to use pastels. Pastels are made by mixing dry pigment with a binder and some filler to form a thick paste, which is pressed into sticks and dried. Pan pastels are a form of soft pastels, but instead of being molded into sticks, they are set into pans or jars. Both forms of pastels have a tendency to rub off. To be sure your color stays on the felt, lightly spray the petals with an aerosol fixative or use hairspray.
NOTE: When spraying fixative, work in a well-ventilated area.

Stick pastels are applied directly to the felt. Be gentle because they are very chalky and a little goes a long way. Place a piece of paper towel down on your work surface before starting. Use a second piece of paper towel to blot excess pastel from the felt. For pan pastels, a blending sponge can be used to dip into the pan then dabbed gently on the felt. For more examples of using pastels on felt flowers, see my tutorials for Coneflowers, Protea and California Poppies.
Eye Make-up - When adding light colors to dark felt, you need a very concentrated pigment. Eye make-up works well on darker colored felts! When making a Columbia Lily, I add yellow color to red felt to achieve the true look of the petals. The yellow pastel was not intense enough but a fellow felt flower maker in the Netherlands tipped me off to using eye make-up! Use the same method of application as pan pastels.
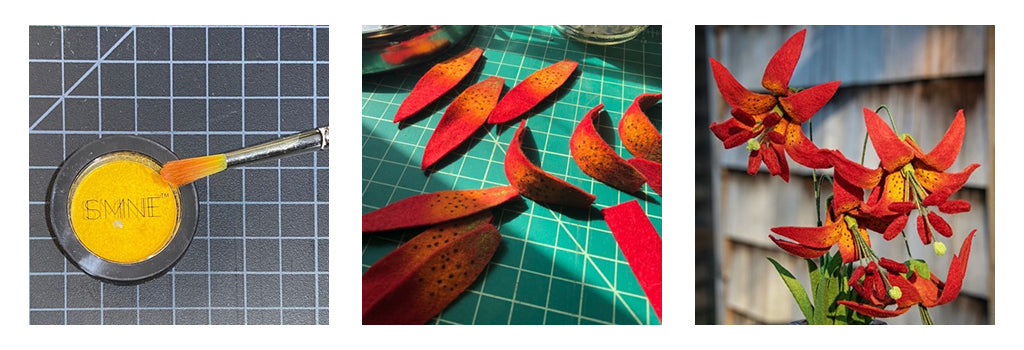
If you look closely at the Columbia Lily (right), you will notice small dots on the yellow portion of the petals. Most lilies have these spots. I used a fine tip marker to make them. There are several types of markers you can use to add shading and detail.
Alcohol Markers - Alcohol markers are great for coloring felt if you need a bright, bold border. If you purchase alcohol markers with a fine tip, you can also use them to make lines on your petals.

The Narcissus (left), has its’ center yellow petal circle rimmed with red using an alcohol marker. Even though the color dries very quickly, some bleeding of the color into the felt will happen. In this case it was the exact look I wanted. The center photo shows a detail from some of my Stargazer Lilies. The center dark rib down each petal and the dots were made with alcohol markers.
Other Markers - I use Sharpies, fabric markers, and other permanent markers to draw accents on petals and add color to stamen stems. The flower stamens are from Benzie Design.

Watercolors - If you want to achieve a soft color wash, watercolor may be applied to your felt in a diluted solution. The water can affect the texture of the felt, so experiment on some scraps of felt first.

Acrylic Paint - I use acrylic paint for a few flowers. The white lines on the edges of the Forget-Me-Nots (left) are done with acrylic paint. The red line on the outside of the green succulent in the right photo is made with acrylic paint and a thin brush. The down side of acrylic paint is that it leaves the felt very stiff when dry.

Airbrush - I have seen examples of using an airbrush painting tool to color petals. I think this looks really wonderful and hope to give it a try at some point.
Embroidery - A time consuming but wonderful way to add color or accent to your flowers is embroidery. I love the way this looks!

The photo on the left is of a blueberry branch. The contrasting embroidery not only gives a punch of color to the berries, it also adds texture. The center photo shows a succulent with an embroidered edge and stitching on its’ thick petals. The photo on the right shows embroidered details on an iris.
Felt - The last method I want to discuss is using felt to achieve a color gradient or to make a bright color block effect. The flowers below each needed a bold color on top of or next to another dark or bold color. The other techniques we’ve discussed did not give the high-contrast outcome I desired, so I used additional felt.

The flowers on the left and right have two layers of felt on each petal. I tried many techniques to allow me to have a bright white accent on the dark blue petals of the Texas Bluebonnet (right) but nothing worked as well as a second color layer of felt. For the flower in the center photo, two colors of felt were carefully glued edge to edge to achieve the desired effect.
You can also use different shades of a single color to add depth. The bluebonnet is made from two Benzie Design wool blend felt colors: Blue and Oxford Blue. The Blue felt petals are above the darker Oxford Blue petals. The change in color is subtle, but really adds depth to the flower.
Combining Methods - You will find the best way to get the most realistic felt flowers is to combine several of the methods mentioned. The photos below all show flowers with at least two techniques used on their petals.

The photo on the left shows hydrangea blossom construction with a combination of gluing two colors of felt together and pastel coloring. The pansy in the center actually uses three techniques: acrylic paint, marker and pastels. The small lily in the right photo combines pastels and marker methods.
In part two of this series, I will demonstrate how to add dimension to your flowers. Combined with the coloring techniques outlined above, adding wire, folding and pleats to your flower construction will enable you to create almost any felt flower in a realistic way!

Thanks to Astrid for designing and writing this tutorial! You can follow her on Instagram @treehousefeltflowers or visit her website. Stay tuned for more tutorials from the Benzie Design Maker Team!


