
If you're Spring cleaning and aren't sure what to do with all those felt scraps, this project is for you! Maker Team member Heather of @heathdon shows us how far those almost-too-small scraps can go with her felt nest and chick tutorial. Don't the little pops of color and texture remind you of a real bird's nest?
Let's make this delightful nest with a chick - a classic harbinger of Spring! This simple pattern is for the resourceful crafter, using two colors of embroidery floss switched mid-project and smaller pieces of felt that can be pulled from your stash. It is an homage to my thrifty grandmother who would use what was on hand, rather than buy new every time. Shreds of scrap paper add unexpected, eco-friendly interest and texture to the nest.
Skill Level: Intermediate
Time: 1 1/2 hours
Supplies:
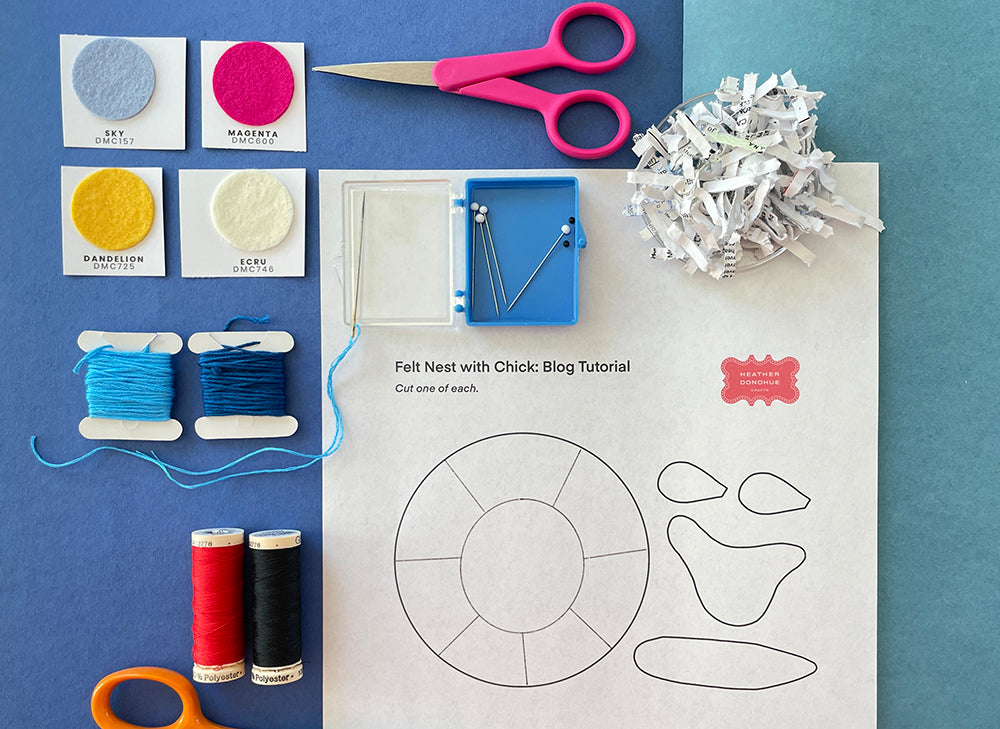
One 9 x 12" sheet of Sky Wool Blend Felt
One 9 x 12" sheet of Dandelion Wool Blend Felt
One 9 x 12" sheet of Magenta Wool Blend Felt
One 9 x 12" sheet of Ecru Wool Blend Felt
DMC Embroidery Floss - 3843 and 158
Sulky Embroidery Thread - 1147 and 1005
Embroidery Needle
Graphite Glass Beads
Scissors
Sewing Pins
Polyfil
Shredded Material (Paper, Felt Scraps, etc)
Nest with Chick Pattern (click to download)
Directions:
1. Print Nest with Chick pattern above and cut out templates. Pin and cut from felt as follows:

Nest - (1) Circle shape from Ecru felt. Cut along the lines that radiate from the center circle.
Wings - (2) from Dandelion felt. Snip a few notches to make a feathery pattern at the smaller ends.

Gusset - (1) from Dandelion felt
Body - (2) from Sky felt
Chick
2. Cut a 16” length of DMC 158. Separate it in half and thread the three strands of floss through the embroidery needle. Knot one end.
3. Pin two chick sides together with a single pin. Starting at the neck and moving towards the head, whip stitch the two halves together. Pause at the rear tip and remove the pin.

4. Pin or hold the gusset piece in place along one side of the belly. Thread three strands of DMC 3843 into another needle, then whip stitch from the neck, stopping at the rear to align the edge of the bird to the gusset. Knot thread inside and trim. Stuff the head with Polyfil.

Use black thread to sew one seed bead eye on each side of the head. Knot thread inside head and trim. Stuff chick body.

5. Return to stitching the gusset to the body. As you round the back tip of the chick, if the gusset seems too big, carefully trim away excess felt before finishing your stitching. Whip stitch up to the neck. Knot floss and tuck inside.

6. Fold a 1” square of Magenta felt in half. Cut a triangle shape for the beak, keeping the fold at the bottom of the triangle. Sew the beak to the front of the chick with a few small stitches of red thread.

7. Pin a wing in place. Whip stitch in place, hiding the knots under the narrow end of the wing. Repeat on other side.

Nest
8. Overlap two sections of the nest as shown. Sew an “X” with your choice of embroidery floss. Continue moving around the circle and secure with an “X” at each overlap until a nest shape is formed.

9. Add shredded material, then set your chick in place!

We can't wait to see your version of this fun Spring craft! If you share photos of your project on social media, please tag @heathdon and @benziedesign.

Thanks to Heather for designing and writing this tutorial! You can follow her on Instagram @heathdon or visit Heather Donohue Crafts. Stay tuned for more tutorials from the Benzie Design Maker Team!


