Share

Baby, it's cold outside! Winter weather is meant for staying inside and crafting. Benzie team member Camille of @notsomodernmillie is sharing a tutorial for monogrammed felt mittens that will keep you warm and busy all winter. Stoke the fire and follow along!
I love to give handmade gifts, but that can be difficult when your list is long or includes teenagers. This project is a wonderful solution because it doesn't take too much time and it was designed specifically to hold gift cards! I've used wool blend felt so these will last over time and personalized each with a cross stitch monogram. Spoiler alert: Mittens for everyone!
Skill Level: Intermediate
Time: 3 hours

Supplies:
Two 9 x 12" sheets of Wool Blend Felt in Contrasting Colors - Midnight, Swan, Moss, Ecru, Ochre, Carmine and Peony shown
Embroidery Floss in Coordinating Colors
18" of Tapestry Wool
Needle for Felt
Needle for Pom-poms
Two Pom-poms, Small
14-count Waste Canvas
6" Embroidery Hoop
Scissors
Tacky Glue
Marking Pen or Pencil
Mitten Body Template (click to download)
Monogram Cross Stitch Pattern (click to download)
Directions:
1. Prepare both sheets of felt for mitten pieces. Cut a 1.5 x 12" strip from the edge. Cut the remaining rectangle into two pieces, one 5.5" wide and the other 6.5" wide. The body of the mitten will utilize the larger sections and the cuff will be in the contrasting felt color. Two sheets of felt will be enough for two mittens.

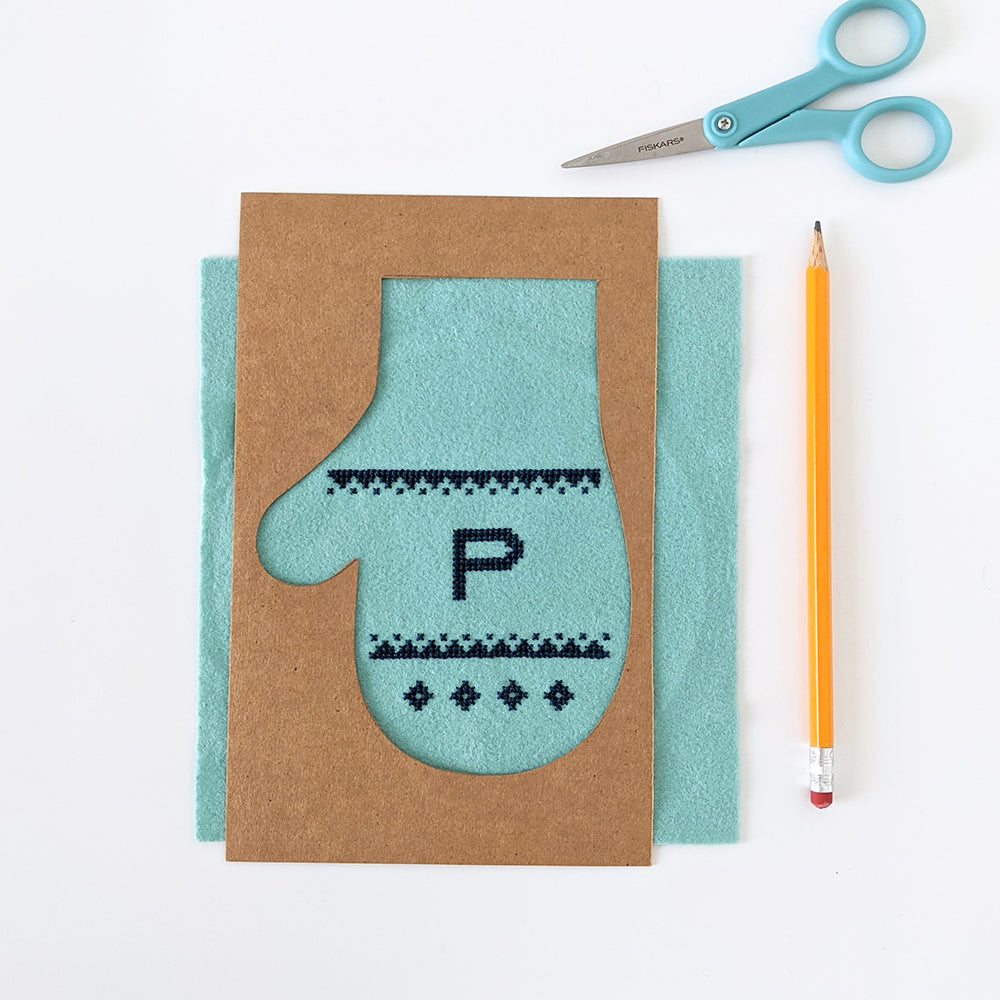
2. Print the Mitten Body Template onto cardstock. Use a precision knife (such as x-acto) and cut out mitten. The negative space of the pattern will serve as your pattern, not the cut out mitten. Trace the mitten onto the smaller felt rectangle, cut out and set aside.

3. Print the Monogram Cross Stitch Pattern and select the letter you want to stitch. Cut a 6" square of waste canvas. The monogram will be cross stitched on the larger felt rectangle. Prepare the cross stitch by aligning the waste canvas along the 6.5" bottom edge of the rectangle. Fit an embroidery hoop over the waste canvas and felt.

Center your monogram pattern in the hoop and stitch design using three strands of embroidery floss. Use an embroidery floss that matches the felt cuff. See Benzie Basics: Cross Stitch for additional cross stitch help, such as centering a pattern.

4. When you are finished stitching, take the felt out of the embroidery hoop. Remove the waste canvas by pulling out the individual strands with needle nose pliers. You might find it helpful to trim away the excess canvas first, as there will be less resistance on the strands. You can also slide scissors between the canvas and felt to make smaller sections for removal. Be very careful not to cut or poke a hole in your felt!

5. Iron the monogrammed felt, if necessary, and place the mitten template over it. Adjust the mitten shape to fit over the design, making sure that the stitching is not too close to the cut edge. Use the picture below for reference.
6. Place the two mitten halves together, right sides out. Using two strands of embroidery floss that match the mitten color, whip stitch around the perimeter beginning at the corner above the thumb. Stop stitching about 1" from the end of the other side, but do not tie off your thread.

7. Cut a 6" length of tapestry wool. I chose a color to match the monogram and the felt cuff. Loop the wool and place it inside of the unfinished mitten edge. Use clips or pins to hold it in place. Continue whip stitching the edge of the mitten, making sure to catch the ends of the wool loop. Knot and cut your floss when you reach the corner. Do not stitch the mitten across the top edge.

8. Lay the mitten face down on the contrasting felt cuff with the top edges aligned. Place the mitten a few inches from the left end, so that the cuff will fold over to the back center. Use tacky glue to attach the left side of the cuff.

9. Flip the mitten over and continue gluing the cuff along the front. When you reach the back of the mitten, trim the cuff to meet the first edge. Glue in place.

10. Cut 1/4" strips from the excess cuff felt. Beginning at the back cuff seam, glue the strips around the perimeter of the cuff to give the appearance of a sweater.

11. To add pom-poms to your mitten, cut a 12" length of tapestry wool. Knot one end and use the darner needle to thread on a pom-pom. Insert the needle approximately 1/4" below the loop into the side seam.

12. Bring the needle back out from the side seam slightly below the entry point. Thread on the second pom-pom. Remove the darner needle and adjust the wool string to the desired length. Tie a knot at the end and clip any excess. Tie the two sides of the string into a knot and secure with a dot of glue.

Your monogrammed mitten is finished! Use them as ornaments, decorations or place settings. It's a great gift for anyone on your list - especially if there's a gift card inside!


Thanks to Camille for designing and writing this tutorial! You can follow her on Instagram @notsomodernmillie or visit her website. Stay tuned for more tutorials!


