
Happy birthday to Maker Team Member Jess of @otterbeestitching! In honor of her special day, Jess is gifting you with a brand new tutorial. This one size fits all pattern with minimal stitching and a fully customizable color palette is a project perfect for the whole family! It can even be completed in an afternoon if you need a last minute decoration or photo prop. Happy birthday, indeed!
Today is my birthday! What better way to celebrate than with a birthday-themed project made entirely out of Benzie’s gorgeous wool blend felt? I’ve designed a cake fascinator that will work for anyone celebrating a birthday, from tiny one-year-olds getting their first taste of cake to grandmothers celebrating 100. Let’s get started!
Skill Level: Beginner, Kid Friendly
Time: 2 - 3 hours
Additional Supplies:
Birthday Crown Template (click to download)
Directions:
1. Print Birthday Crown Template above. Cut all pattern pieces from felt. For Frosing layer, cut two Crown pieces from Pink felt. Use Frixion pen to draw a drippy frosting pattern horizontally across the entire piece. Trim excess with scissors.

2. Pin one Frosting layer to one Crown layer. Use one strand of pink thread and a running stitch to stitch along the bottom edge of Frosting only. Repeat this step for the second set of Frosting/Crown pieces.

For this entire pattern, you will be working with a single strand of thread for each step. I recommend threading the needle and tying thread ends in a knot. This will keep the needle from slipping out inside the pieces.
3. Arrange Sprinkles on Frosting layer. Use as many or as few Sprinkles as you like! Secure each Sprinkle with a small dab of glue. Repeat this process for the second side (inside of crown) or leave blank. I chose to sprinkle both sides, as you can see the inside of the crown when it's being worn.

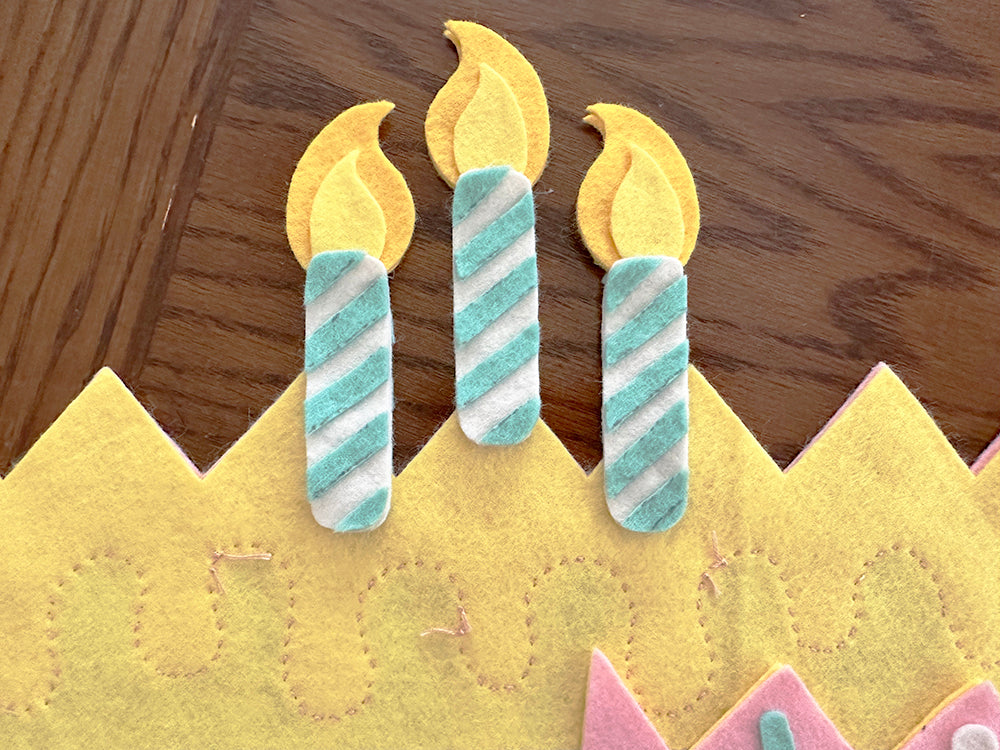
4. To make candles, use a Frixion pen to draw angled lines down the length of each Julep Candle.

Cut segments apart and distribute between two Linen candles, alternating back and forth. Secure each stripe with a thin line of glue.

5. Assemble the flames by gluing Inner Flame to Outer Flame, centered and aligned at the bottom. Assemble three with points facing left and three with points facing right.

6. Glue the front and back halves of each flame together.

7. Lay one Candle piece face down and glue bottom curve of one flame to the top. A tiny dab of glue is all you need for this step.

8. Glue another Candle, face up, to the back of the first piece. If you find a small gap where the flame is inserted into the candle pieces, squeeze a tiny dab of glue into that space and hold closed. Repeat steps 7 and 8 to complete remaining candles.

9. Lay the inner Crown piece face down and position Candles. Place one near the top of the central point and the other two centered between the point and the dip of adjacent points. Secure each with a small dab of glue.
10. Cut two lengths of ribbon measuring 12-15”, depending on whether crown is for a child or adult. To ensure the ribbon extends from the sides of the Crown, position ribbon below the second and fifth dips (see photo). Secure the end of each ribbon length with a small bit of glue.

11. Layer the front Crown piece on top of the inner layer. Carefully align all edges and pin in place.
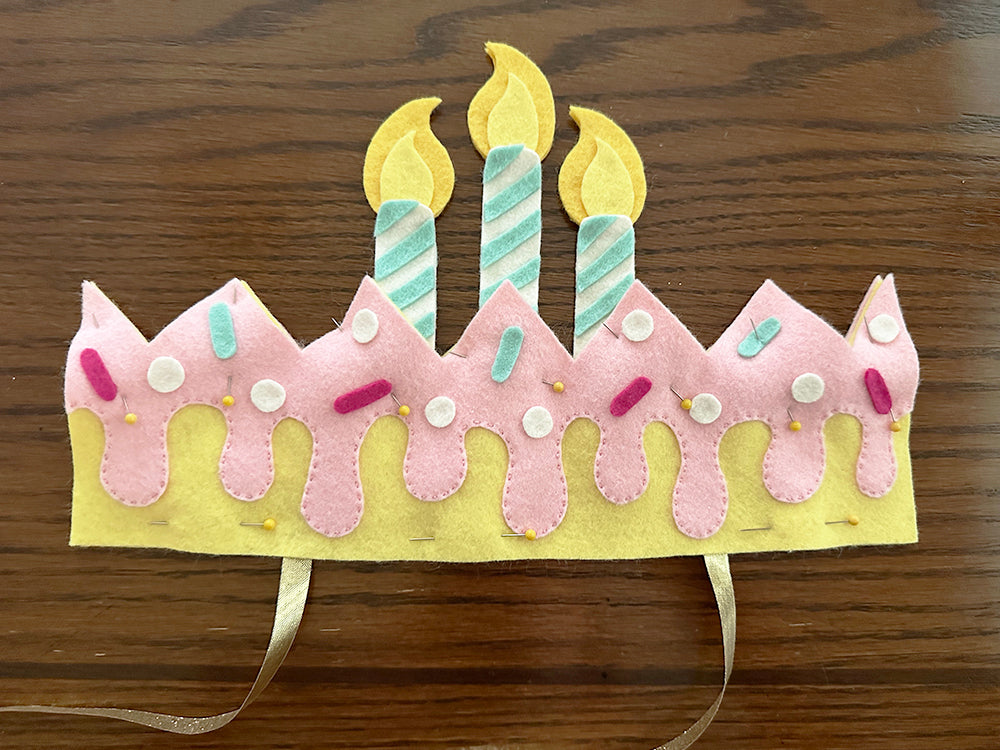
12. Use one strand of coordinating thread and a running stitch to stitch along the top and bottom edges. Leave left and right sides unstitched for now. When starting the running stitch, bring the needle up through only the front side to hide the knot inside the crown.

13. To finish the back seam, curl the crown so the front side faces out and the left and right sides meet. Beginning with pink thread, bring the needle up through the front piece on the left side. Bring the needle down through both pieces on the right side, directly across from your entry point on the left. Repeat this process, coming up on the left and going down on the right, to create a bridge between the two sides. Switch to yellow thread when you reach the Butter felt and continue stitching the remaining seam length. If holding the pieces together with your hands is difficult, pin the edges together.

Congratulations, you’ve successfully completed your birthday cake fascinator!

This little crown works for anyone celebrating a birthday, from babies to adults, and you can change the color palette to suit any theme. Changing the shape of the sprinkles or the pattern on the candles can also add so much personalization. I can't wait to see how you make this project your own!

Thanks to Jess for designing and writing this tutorial! You can follow her on Instagram @otterbeestitching or visit her website. Stay tuned for more tutorials from the Benzie Design Maker Team!


