
As a final tutorial with our Maker Team, Kasia of @theadventuredept has created the most beautiful felt Tulip Study. With two variations, one a delicate fringed tulip and one inspired by that most famous Semper Augustus, this tutorial is a must for anyone who appreciates flowers! The details are simultaneously natural and otherwordly - which is how one might describe Kasia. We are so excited to present her brilliant Tulip Study!
There are a few points of inspiration that I can’t help but return to again and again, and one of them is vintage botanical and scientific illustration. I just can’t get enough of these lovingly crafted and precise records of flora and fauna. With that muse in mind, the Tulip Study presents a specimen, from bulb to bloom, in full felt glory. There are a good number of steps and more than a handful of materials required. But I hope that the process - slowing down, taking time to make something beautiful - is a gift of its own. We all deserve to nurture our creative selves!
Skill Level: Intermediate to Advanced
Time: 3-4 hours (plus drying time for Semper Augustus tulip)
Additional Supplies:
Tulip Pattern (click to download)
28 gauge Wire in Green
28 gauge Wire in White
Red Fabric Paint
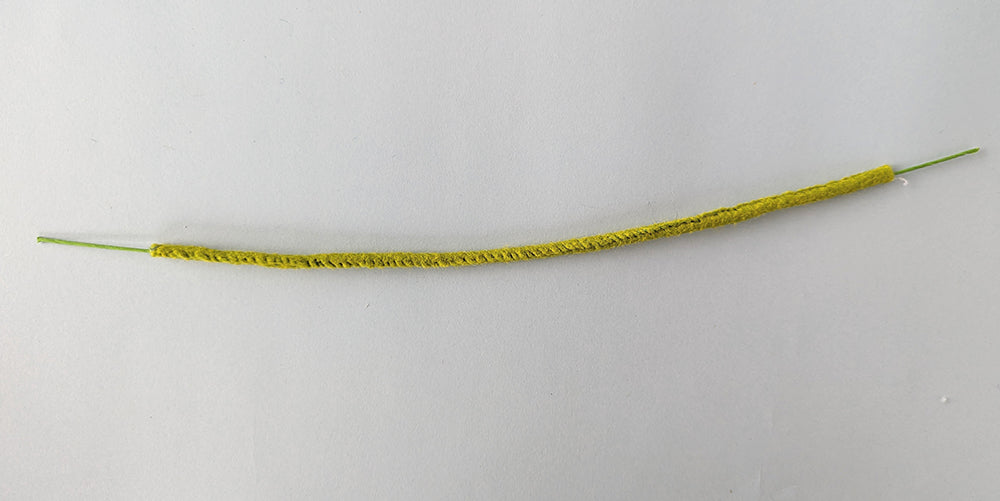
Stems
1. Cut a rectangle 1 x 14” long from green felt - Fern for Fringed tulip, Moss for Semper Augustus.

2. Center an 18” green floral wire on the strip and fold about ⅜” of material over wire. Using matching thread and a running stitch, securely stitch a channel around the wire. About 2” of bare wire will extend from either side of channel. Example shown uses a darker thread to illustrate stitches.

3. Once stitched, roll remaining felt tightly around the wire. Whipstitch closed tightly with matching thread.

Tulip Center
4. Cut three PISTIL from Citron felt. Hot glue three pistil pieces evenly around one bare end of the stem wire.

5. Cut three 2” lengths of white wire. These are stamens. Cut six triangles, each roughly ½ x ⅝” from Dandelion felt. These are anthers - little pollen-filled bits at the ends of tulip stamens. Fold each anther piece in half and glue to wire ends to make three doubled-ended stamens.

6. Fold each wire into an even V-shape and glue around pistil base. Wrap a scrap of green felt around the connection point after gluing for additional stability.

Tulip Bulb
7. Invert felt heart so the point is up. Ball up small amounts of white roving and needle punch onto widest parts of the flatter sides of heart to create a rounded teardrop shape. Work gradually to create a smooth transition between the heart and the rounded area.

8. When flatter sides are built up to about 75% of the width, begin wrapping thin layers of roving around entire shape. Needle punch into place until it is a well rounded bulb. As in nature, no two bulbs are identical, so don’t stress if it’s not perfectly symmetrical.

9. Once satisfied with bulb shape, add roots with white, beige and brown embroidery floss. Cut 2-4" lengths of embroidery floss and sew through base of bulb. Tie off with a square knot. Add as many roots as you like. Trim length as desired.

10. Use a large needle or awl to poke a hole in the top of bulb. Insert exposed stem wire into hole and hot glue in place.

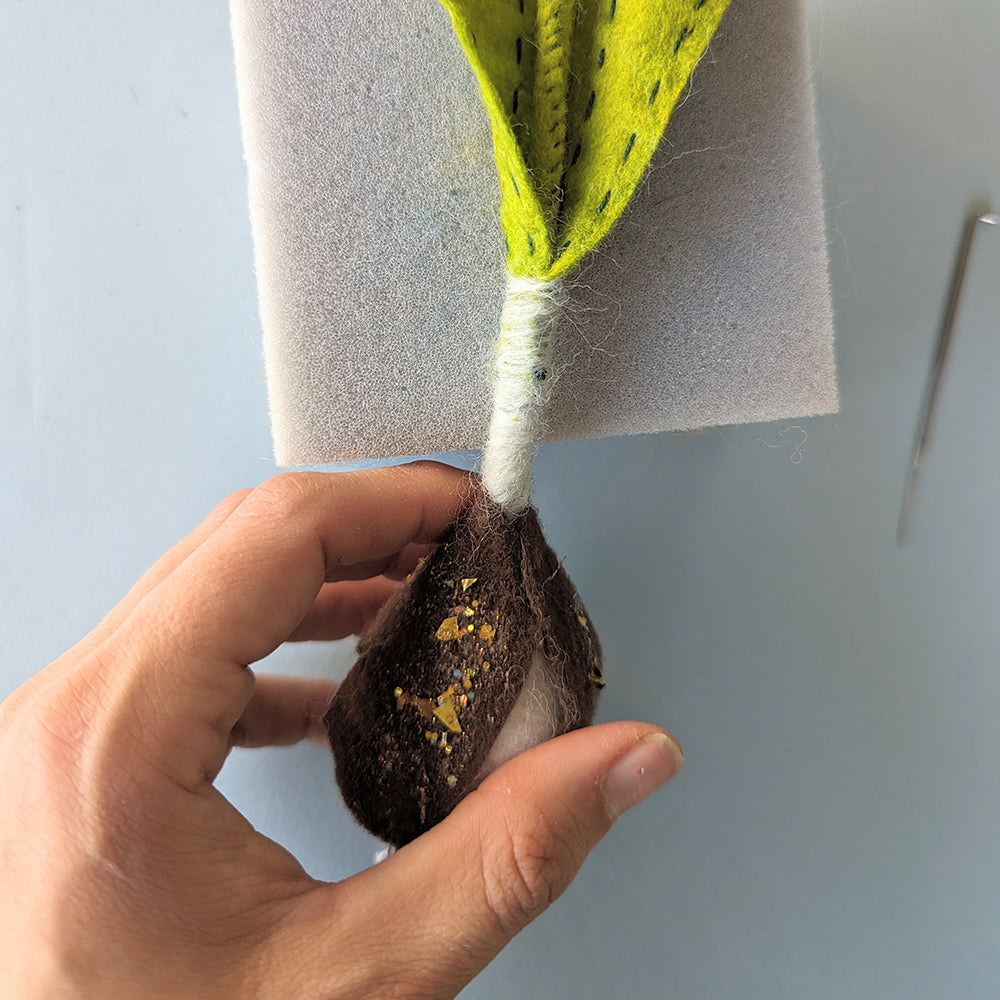
11. Needle felt a small amount of white roving over the “seam” between stem and bulb to create a gradient of color between white bulb and green stem.

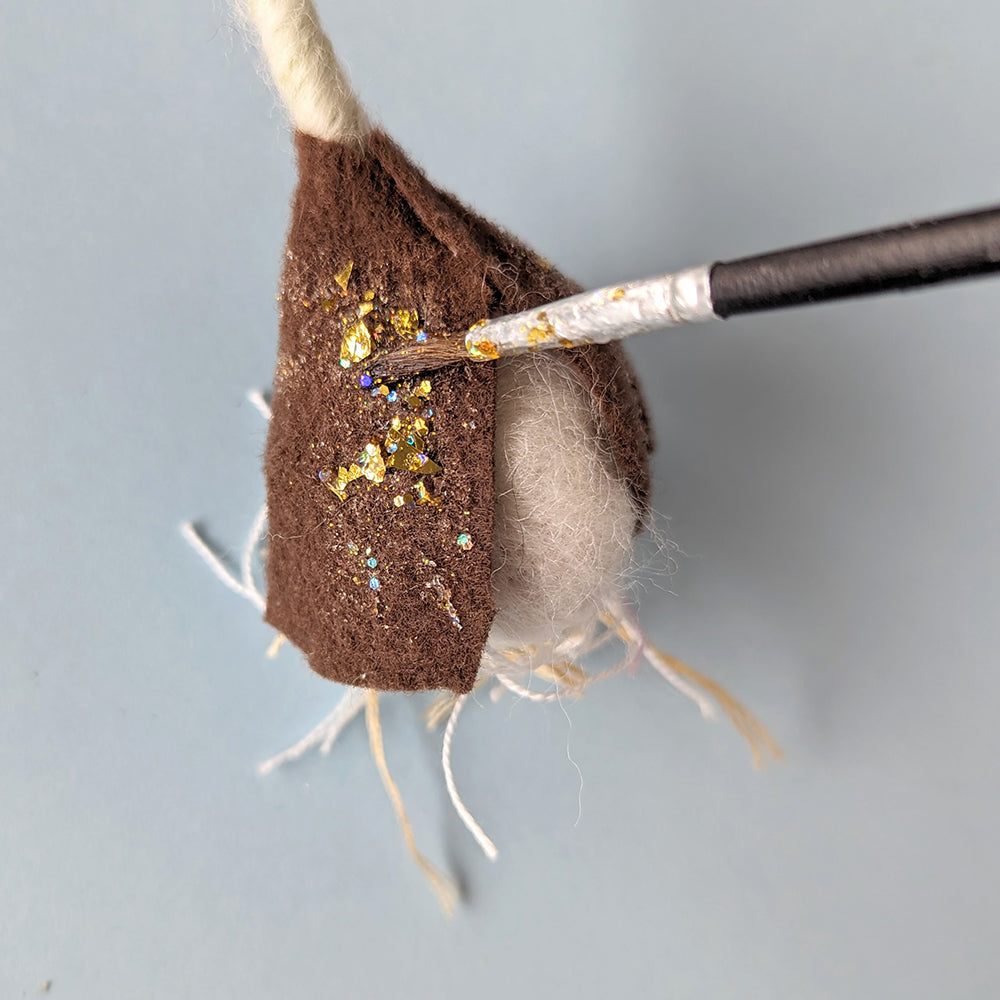
12. Using Brown felt, create the tunic (paper-y brown covering) of the bulb. Experiment with shapes and forms - it shouldn’t cover the bulb perfectly. It should look as though it’s spent some time underground, with cracks and exposed areas of the bulb. Hot glue tunic pieces to bulb.

As an optional (and encouraged) step, dab metallic or glitter paint on the tunic for extra flair.
Leaves
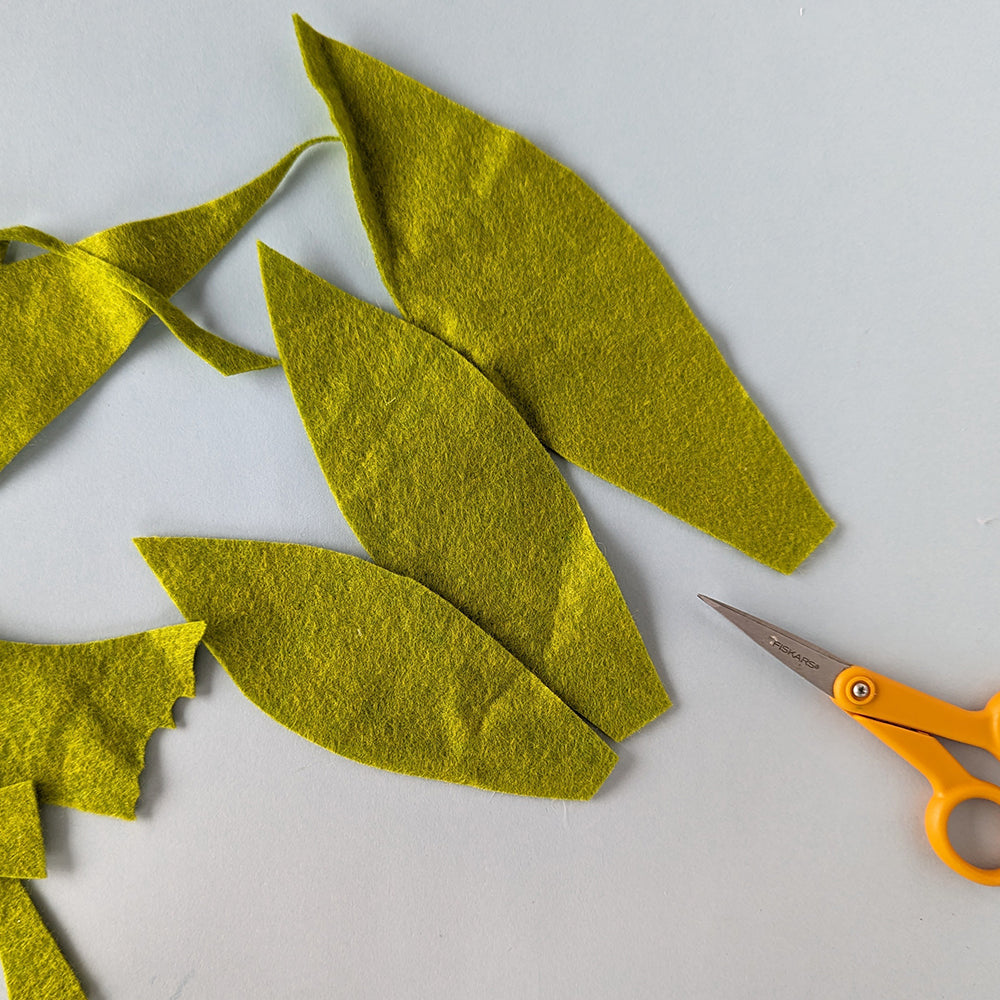
13. Cut LEAF A, B, and C from green felt matching stem felt from Step 1.
14. Cut a length of 28 gauge wire 5-6” longer than the leaves. Thread a needle with wire. Thread the wire invisibly through entire length of leaf edge. The goal is to have wire fully encased in the leaf, but don’t stress if it isn’t completely hidden.

Clip wire so only ¼” pokes out from pointed end of leaf. Bend excess back firmly into the felt to hold wire in place. Dab a tiny dab of hot glue over this excess to help lock it in. Leave excess at base of the leaf. Repeat along second edge.

15. Repeat Steps 13-14 for remaining leaves. The light-duty wiring gives extra body and bendability and avoids unsightliness of a wire or floppy leaves.
16. Following stitch guides on the pattern pieces, embroider lines of running stitches in a contrasting shade of green. I am using a dark green thread on light green felt. The other examples show the inverse. Add more or fewer stitches to suit your taste.

Petals
17. Cut six PETAL A (for Fringed Tulip) or PETAL B (for Semper Augustus). Do not cut darts yet!
18. In the same manner as leaves, run a hidden White 28 gauge wire up the center of each petal. Clip excess, bend back, and add a bit of glue.

19. Fringed Tulip: Use a turkey work stitch and 2-4 plys of Lilac floss to add fringe along the top of the petals, as indicated on the pattern. Each stitch should be about ⅛” apart but varied for a more natural look. Don’t worry about making the loops exactly even as they’re going to be cut. Trim fringe to ⅛”. Repeat for all six petals.

Semper Augustus: Using fabric paint or markers, draw Red “broken” pattern on petals. Use sample layout in the pattern as a guide. Allow to dry, then flip over and paint backside. Hold petals up to a window or lightbox to match the pattern on both sides, if desired. Paint edges for a natural look and set aside to dry.

20. Cut slits for darts, avoiding the center wire. Overlap slit edges about ⅜” to form cupped shape and hot glue in place. Note that Fringed Tulip has darts at both top and base of each petal, while Semper Augustus only has a dart at base. Trim bottom edge if darts don’t align perfectly.

Assembly
21. Arrange three petals evenly around the flower center. Hot glue in place. Offset the second row of petals from the first and glue in place.

For a more closed flower, bend petals into more prominently cupped shapes. For an open bloom, allow petals to fall naturally. Or even invert cup of petal to capture the fading, ephemeral beauty of a tulip past its prime. Am I the only one who loves that stage?

22. Choose three points along stem for leaf placement. The largest leaf will be lowest and the smallest leaf will be highest. Starting with the largest, wrap base of leaf tightly around stem. Whipstitch to the stem and leaf itself. Wrap excess wire around stem once or twice and clip remainder.
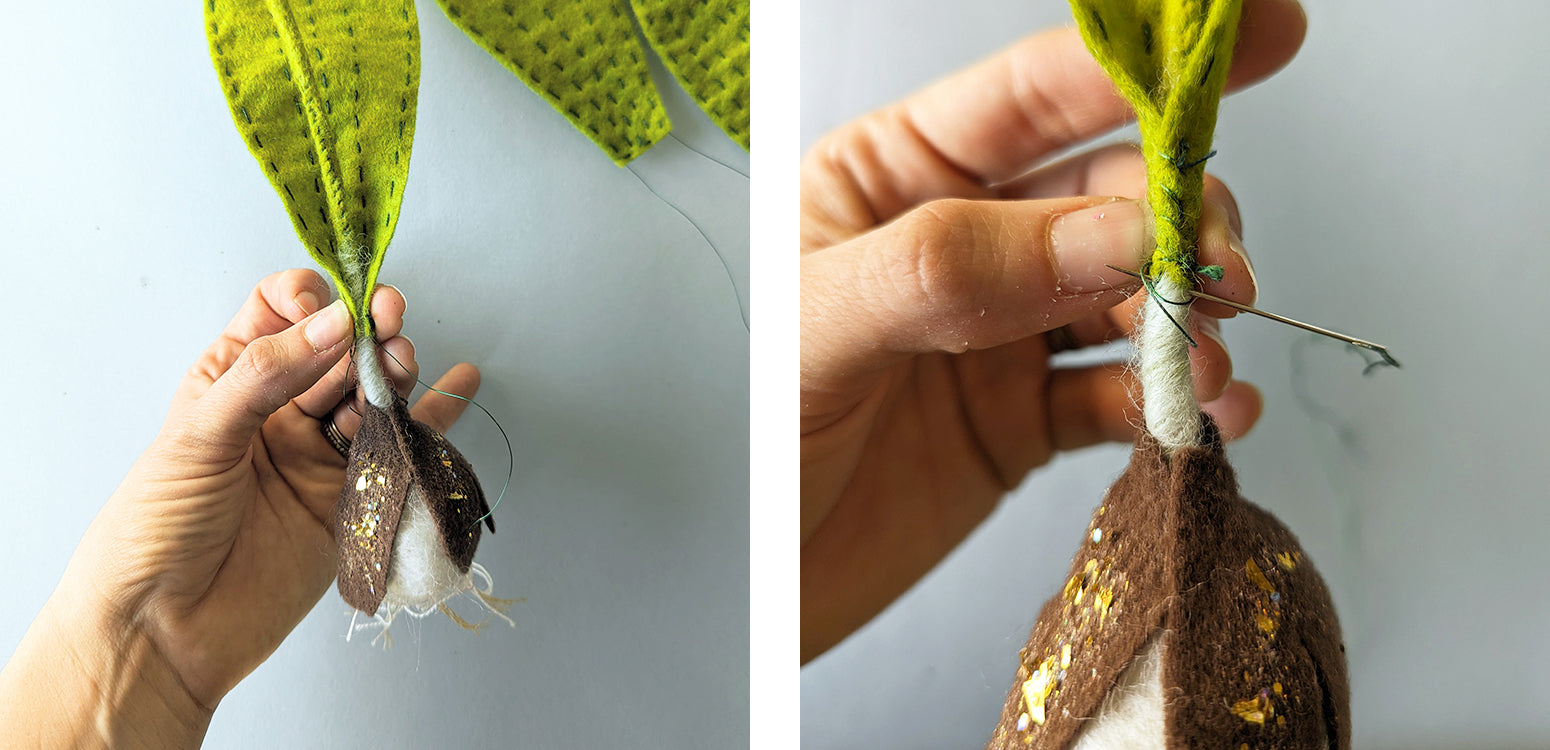
23. Wrap a very small amount of light green roving around connection point and needle felt into place. Be careful to avoid wire inside the stem. You can also wet the roving with hot water and roll between your hands for a smooth, felted finish.
24. Repeat Steps 22-23 for other two leaves, taking care to alternate direction each leaf is facing.

Once the leaves are secured, arrange and bend the petals and leaves to your liking.

So what to do with your specimen? A simple and lovely way to present your finished tulip is in a plain cylindrical hurricane vase. Make one or two or ten and line them up along a windowsill for real greenhouse vibes. These also look fantastic mounted in an open shadow box or even hung directly on the wall.

Whatever their final home, I hope that both the process and product bring you joy. Developing this project and the other projects I’ve worked on as part of the Maker Team this year certainly has been a joy for me. It’s been such a privilege to share with you all.


Thanks to Kasia for designing and writing this tutorial! You can see more of her work on Instagram @theadventuredept and on her website. Stay tuned for more tutorials from the Benzie Design Maker Team!


