
This week we have the pleasure of introducing new Benzie Design Maker Team member Kasia of @theadventuredept. Kasia's work has an ethereal beauty and her ability to transform felt into organic objects is nothing less than magic. We are so excited to have her join our Benzie Team!
Channel your inner mermaid with this Oyster Trinket Box! The internal ribbon tie is the sweetest way to secure a ring or a special momento, but this oyster can stand alone as an objet d’art too! This pattern makes a hand-sized oyster, perfect for holding a necklace or bracelet, but scale the pattern up or down to fit other treasures. I’m loving the idea of a mini version as a ring box for all those upcoming beachy weddings; can’t you see the flat-lays now? Don’t be intimidated by the number of pattern pieces - nature is variable and your felt oyster can be too. The pattern exists as a guide and not a rulebook: there’s room for creativity in the level of detail and intricacy!
Skill Level: Intermediate, Advanced
Time: 1 1/2 - 2 hours
Additional Supplies:
Oyster Shell Pattern (click to download)
Thin Cardboard, such as a cereal or shoe box
Rainbow Iridescent Beads - optional
Moonstone Sequins - optional
Directions:
1. Download and print pattern above. Cut pattern pieces from corresponding materials. Because there are a number of pieces, it is helpful to divide the cutwork into separate piles for bottom and top shells.

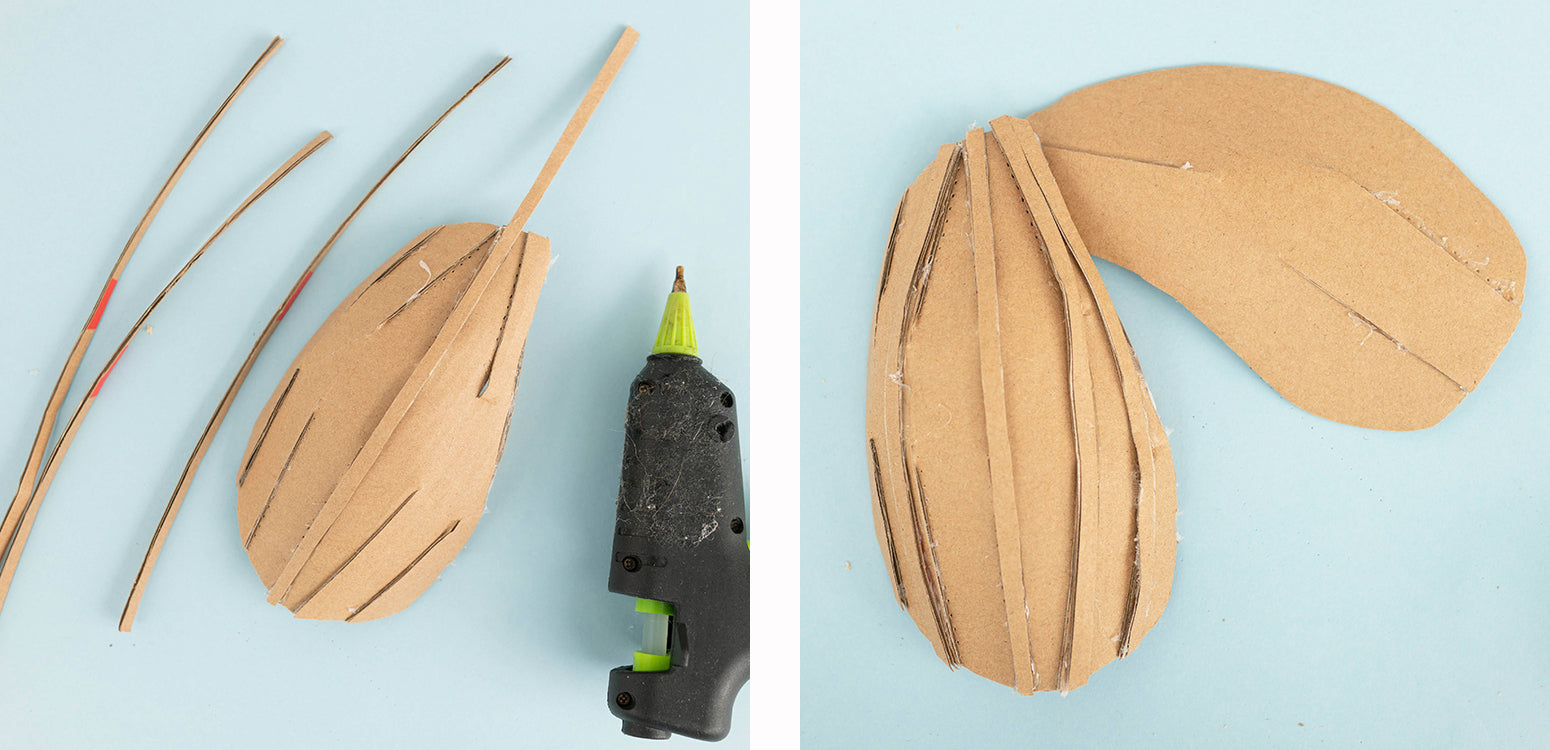
2. The cardboard pattern pieces have multiple kinds of markings - dashed lines for placement and solid lines for cutting. To mark placement lines on cardboard, a needle-point tracing wheel or awl works well.

3. To form foundation for oyster, overlap cut cardboard edges with dotted lines and glue in place. Repeat for all darts on both top and bottom shells.

4. Once both halves of foundation are glued, trim and round any uneven edges.

5. Run a bead of glue along curved edge of shell. Attach side insert piece perpendicularly where indicated on pattern.

6. Cut four ⅛” strips of cardboard. Glue these strips to upper shell as marked on pattern. We will refer to these strips as the “ribs” later in the pattern. Cut off any excess.
7. Test fit pieces. They should comfortably nest together, with bottom half tucking gently into top. Depending on thickness of cardboard, bottom shell may be slightly larger than ideal. Trim edges until fit is to your liking.

8. To cover bottom half of shell, gently stretch felt piece labeled SHELL-BOTTOM-FELT over convex side, making it as smooth as possible. Adhere by stretching edge of felt over edge of shell and gluing in place with a thin bead of glue. Work around entire shell until it is fully adhered.

9. Glue HINGE piece in place according to markings on pattern.

10. Next, line bottom (pattern pieces BOTTOM-1-LINING and BOTTOM-2-LINING). Place BOTTOM-1-LINING about ⅛” inset from edge of shell. Carefully smooth lining into place, adhering with a bead of hot glue as you go.

11. Cut a 9” length of ribbon. Fold in half and adhere with a bead of glue to cardboard as marked on pattern. Align BOTTOM-2-LINING, overlapping edge of first lining piece slightly. Make sure ribbon is out of the way before gluing, and align top edges of pieces as they will be visible. Glue in place.

12. Glue one felt RUFFLE piece along edge, starting at dot as marked on pattern and continuing around bottom. The bottom shell is done!

13. Now that you’ve familiarized yourself with the process, time for the big show - the top half! If you are planning to add any hand embroidery or beading, now is the time. I’ve added a few rows of a simple running stitch, but feel free to make this your own by adding your favorite flourishes. Beads, sequins, and French knots all make excellent “barnacles!”

14. Find felt SIDE piece. Fold down middle and glue over cardboard “side”, slightly stretching to keep it as smooth as possible. Glue any excess to top and inside of scoop.

15. Let's begin building the layers from bottom up, starting with SHELL-TOP-1. Align this piece with bottom edge of foundation, overhanging edge by about ¼”. Starting in middle, run a bead of hot glue down side of one rib and press felt into glue with your fingernail. Repeat on other side of rib. Continue in this fashion, radiating from center and slightly stretching as you work, until piece is fully adhered to foundation.

16. Overlap SHELL-TOP-2 over SHELL-TOP-1, following markings on pattern as a guide, though you may want to adjust to your aesthetic preference. Glue in place in same manner as first piece, continuing to press felt into sides of ribs with your nail to create definition.

17. Find the two CONTRAST-1 pieces. Using a couple dots of glue, adhere to each other, slightly offset, then glue to back of SHELL-TOP-3.

18. Glue this set in place as a single unit. Orient this piece so all remaining visible cardboard on this side is covered. Before gluing top edge, sandwich other half of hinge between cardboard and SHELL-TOP-3, then securely glue. If there is significant overhang, trim it in line with edge of shell. Glue SHELL-TOP-4 in place in same manner.

19. Glue two pieces of CONTRAST-2 together, again slightly offset, then glue to back of SHELL-TOP-5. Glue as a unit in place.

20. Glue SHELL-TOP-6 in place. Take a moment to look at your piece. Because of slight differences in alignment, you may find yourself staring at a little sliver of cardboard in an inopportune spot. No need to panic - cut a very narrow piece of felt and fill it in. Pretend it’s what you meant to do the whole time. We won’t tell!

21. To line top shell, glue in same manner as bottom shell, but start by gluing center piece in place. Slightly overlap two side pieces and glue as smoothly as possible.

22. Following notches, glue cotton RUFFLE around bottom inside edge. Follow with remaining felt RUFFLE directly on top, neatly covering smooth raw edge of cotton.

You did it! Make one, make twenty - heck, start a whole mollusk colony in a rainbow of colors!


Experiment with adding scraps of other types of fabric - silks! linens! velvets! - instead of quilting cotton. There are so many ways to personalize this. The world is your oyster! (Sorry, I had to.)

Thanks to Kasia for designing and writing this tutorial! You can see more of her work on Instagram @theadventuredept. Stay tuned for more tutorials from the Benzie Design Maker Team!


